Rubicon Tycho Plank (Etc.) Spoilers
Introduction
©2009 Kevin Jaques. All Rights Reserved.
“Spoiler” is such a harsh word. Yes, if you read these before playing the level, you will permanently deprive yourself of much of the fun and glory of playing this great story line. But if you have done all you can, and are either hopelessly stuck or dont know whether you should go on to the next level or keep looking, then these are “Improvers”.
The Tycho ‘plank’ is one of the possible story lines in the (free) Rubicon ‘Scenario’ for the ‘Aleph One’ ‘port’ of the ‘Marathon’ ‘Game Engine’
To understand those terms, and much of what follows, please read my Marathon/Aleph One Introduction Tips & Techniques
If you are new to Marathon, you play a Cyborg Marine raised on Mars. The UESC converts one of Mars’ Moons to an immense ship, the Marathon, on which you embark. You travel in cryogenic sleep until you are awakened because the Marathon has accidentally encountered an alien race. That race is now attacking. The race is actually the Empire of the Pfhor, which enslaves other races. Various AIs (Artificial Intelligence (computer programs)) on the Marathon seize the opportunity to gain new resources and turn ‘rampant’, in which they go through stages such as greed, paranoia, anger, then maybe, it is hinted, eventually stability. In essence, they come alive. You encounter evidence of an ancient super‑powerful race (?) called variously Jjaro or Yaro, and their ancient enemy, the demonic W'rkncacnter.
Rubicon fits in after the Bungie Scenarios. Durandal, one of the rampant AIs, seems to have settled down and to be helping mop up the Pfhor, while Tycho is another AI. Tycho seems to have adopted a maniacal evil persona. The Salinger Corporation is doing mysterious research.
My son, Sam Jaques, summarizes the planks like this. If you are obedient and efficient, you will follow the Salinger Plank. If you make evil choices, you’ll follow the Tycho Plank. If you make the easiest and most obvious choices, you’ll follow the Pfhor Plank. But if you’re like me, you’ll always resist the pressures of the game and wind up switching confusingly back and forth between planks and secret bonus levels until your son has to explain the whole thing to you.
I am publishing this because none of those links contain spoilers, or even a list of levels to the Tycho Plank. But while I am at it, I offer some advice on non‑Tycho levels, such as bonus levels.
I have uploaded a Complete Excel List of the Rubicon Levels and a an HTML version of the Complete List of the Rubicon Levels. It will show the path I took, the ideal path, the map numbers, and how the maps link together. If it doesn’t say otherwise, assume that a map links to the immediately following map.
See the Complete Rubicon Spoiler Guide for a list of the new enemies.
Now, to play the Tycho plank, play the scenario as you will, till you get toä
Rozinante IX
This is a pivotal map, set back in Durandal’s ship. He’s designed a virus to attack another AI to supposedly save humanity. The Complete Rubicon Spoiler Guide and the Rubicon Secrets Guide cover this level, but to embark on the Tycho Plank, do the evil thing, which is actually sort of funny. Then find the Tycho terminal and obey. Don’t forget to get your purple.
This will take you to “Carpe -mumble mumble latin”.
If you failed to do the right thing, you get another chance in Rozinante XI.
Rozinante XI
This is your second and last (?) chance to get on to the Tycho Plank.
The Complete Rubicon Spoiler Guide and the Rubicon Secrets Guide cover this level, but there will be a Tycho terminal in the central hall. Do what he says instead.
Carpe -mumble mumble latin
Carpe means ‘seize’. It’s probably a reference to the saying “Carpe Diem” which means “Seize the Day”.
You are assigned to kill all the Enforcers, the ones that look like wizards. It’s fun because Tycho has subverted all the other Pfhor classes. Once you flush an Enforcer, the others will attack it. Your biggest problem will be avoiding the friendly fire of your new allies. However, I soon ran out of allies.
But there are no chargers, so save often. There are charge cannisters, but use them wisely. Assuming you are on Total Carnage, if you take unnecessary damage, just die. Only save when you took the least reasonable damage to kill something, then only charge when you have just a little red left.
Enforcers drop their guns unless exploded or vaporized when killed. You can pick them up. Their guns are very good, so as a rule, don’t explode or vaporize them. These ‘Alien Weapons’ can’t be reloaded, so generally when you get one, use it in preference to other weapons as long as there is one left. Then, when you leave the level, empty your alien weapon then pick up the remaining one. That’s the most you can take anyway.
However, Enforcers have abnormally fast reactions and shots compared to the other aliens and their gun hits hard. They hesitate a little bit when hurt, so you can essentially freeze them if you hit them fast enough, such as with a maser or AR (automatic rifle) or fusion rifle. However, they tend to jump a bit when first hurt too, so sometimes they jump out of the stream of fire and shoot back. With the AR, you have to be quite close to ensure that sufficient shots are hitting. Masers are the perfect weapon for them, because the Enforcers can be frozen at long distance, but maser batteries are too valuable.
Therefore, when you can, use the Alien Weapon for all the but last shot. Otherwise, you’ll vaporize them, and their gun. At least do that until you have so many alien weapons lying around that it just doesn’t matter. However the Alien Weapon isn’t fast enough to freeze them. So, it’s a lot of shoot‑and‑duck. However, if you can get under one so you can see only their head, then the ledge blocks their shot and you can shoot with impunity, except that it is a very precise shot and position. So save often. Oddly, there are spots in the map where you can see just their feet. Inexplicably, they can shoot back from those positions.
I usually deal with Enforcers by attracting them by hitting them with a shot, then when they come around the corner, I blast them with the AR. In this map, most refuse to be drawn.
I found no (?) ammo caches. This level drained my ammo nearly dry, even being very frugal.
You start in a diamond shaped room with a window. The eastward door opens onto a long and wide NS hall filled with Pfhor fighters ignoring you. That hall has one other door open. Through it, there are two Enforcers lurking in the dark. Flush them with pistol shots then hide.
Don’t forget that Pfhor sometimes go nuts and attack their friends when injured too much. That includes you now, so don’t trust them too much.
Once the fighting is done, you will find an array of switches in a pattern roughly matching the doors in the NS hall. Starting from the southmost switch, moving clockwise: nada, save room, nada, nada, room just south of entry point, nada, nada (this is the north most switch), northmost door on west side (grey doors), doors south of the last door (double doors with green centres leading to the Enforcer Ledge), doors south of the last door (double doors with green centres leading to the Hunters), nada, nada.
I never figured out how to get the inactive switches working.
Obviously head to the save room first.
I would then head for the Enforcer Ledges room. Many enforcers are on two ledges and they will be wiping out your allies. Hitting them with pistol shots will turn them towards you. You will duck and your pals will kill the foolish Enforcer. Once you get one ledge cleared, you can use the up‑shooting technique I mentioned to finish the other ledge.
In the Hunter area, flush the Enforcers, if any, and let the Hunters kill them. There are vertical bars. Your pistol will mostly penetrate those. Enforcer shots will mostly not. So, get some Enforcers into sight behind those bars. To do so, there is a ledge around a corner to the left. Wake up the enforcers with a pistol shot, then rush back to the bars to distract them with your pistol before they wipe out the Hunters below the ledge. Typically, you’ll be left it one Enforcer. Rush around the corner with AR shooting on a full clip.
On that ledge, there will be a switch. It opens one of those auto‑close doors, so hit it again before it finishes. This will open a big door leading to that array of switches. It’s not a big deal. But there is a purple cannister there! There are stairs below. They are too dangerous at this point, so don’t jump down.
Now return to the Enforcer Ledges room. You can get into a corridor running along the north side of that room. Take the second last turn south, to work your way up to a big room, surprising and killing Enforcers along the way.
Retreat back to the north side corridor then got to the last turn. Play duck and shoot with an Enforcer on a long upward staircase.
At the top, use your maser on an Enforcer on a ledger far across the large room.
To your right, there are long, red computers(?). At the north end of them there is a door. There is a yellow cannister and a save point beyond it.
From here, apply the techniques to kill all the Enforcers.
There will be two Thinkers too. Remember that shotguns are best for them, usually three close shots, so some damage is expected.
At one point, I seemed quite stuck. I wanted to go around a corner and up some stairs but there was a Thinker and an Enforcer. The solution was to go to a new vantage point, kill the Enforcer, then return to this point to kill the Thinker. To get to the new vantage point, from the second save point, head west to the big brown NS hall. Move S past the jump‑down point, then turn NE towards a big orange wall and into the halls beyond it. You should have cleared this path from other approaches already. In this area, you can shoot up at a lot of Enforcers, though there is a big collection of them in a room. That room will have a red cannister.
Ultimately, you will wind up at a big door which can be opened. You will now be on the ledges in the first Enforcer Ledges room.
When you get into the large upper area, there will be a yellow cannister that appears near a good tactical spot for duck and shoot. Try to avoid it. You will head for a SE corner alcove which contains a red cannister. However, additional Enforcers will teleport in so have your retreat in mind.
When done, the terminal at the far SW is the exit to “Like home this ain't I”. Don’t worry about how weak you are when you leave.
Like home this ain't I
You are definitely on the side of evil now. This is Tycho’s home base, a dark and ominous hall with many Pfhor, though they ignore you unless you touch them. Is ‘hellish’ appropriate?
There is a red charger, a save point, and the exit Terminal to “iwannavacuum II”.
Before you use the exit, do a loss‑less double backward Rocket jump up on to the ledge. In a room off the ledge is a purple charger, a funny terminal and another save point.
There is some sort of device in that room, possibly an alien card or chip reader. If you figure out how to bring such a thing, and if something interesting happens, let me know.
iwannavacuum II
Tycho has discovered that Pfhor have blasted their way into a space station where humans were develping a virus. Tycho wants to keep it out of Durandal’s control. He says find a curiously marked portion of wall and blow it up.
So, it’s a vacuum level, and you’re desperately short of ammo.
You teleport in. There is a terminal where Tycho briefs you. There is a broken switch, and a switch that open a window to see some scenery. Maybe it contains a clue. I didn’t get it.
As you leave, you run through a big room with fighters into a small room with a trooper. Beat him down with your fists. Unfortunately, fighters arrive before you are done. Get on the other side of them, punching them, while the trooper riddles them with friendly fire. Don’t worry about damage, there is a yellow charger coming up.
Find the elevator. It goes to three levels. There will be other elevators, so learn to recognize this one. I never could.
Go to the middle level. You’ll see a trooper in a trench. Jump into the trench on his right hand side. Start punching. A couple of fighters will come. When they are done, advance till you hear more enemies teleporting in. Retreat behind the door of the elevator. Use the door, watching your oxygen level. Once these guys are done, one more yellow fighter will teleport in, just as you engage the air supply you find down the stairs.
From here, go to the bottom level. Punch everybody out, occasionally rushing back for more oxygen.
Once they are gone, read the terminal. Lysander taunts you. From this room, you can see down to some S’ppht. Don’t jump down, they are all around. Instead, find the elevator and take it down. If things get too hairy, take it back up. Once it gets to the top, there is a narrow hall in which to line up and punch those who got on the elevator with you.
Once they are gone, and you go back down and clean up the remainder, you will find another elevator that goes to three levels. Go to the middle one.
This middle level will have some compilers around things that look suspiciously like large alien toilets. Maser ammo will teleport in as you explore this room.
The upper level will have two troopers. Use the door. It has a ledge you can jump off or an elevator you can ride down. Use the elevator, then punch out the fighters that come. Make sure you get both yellow and grey. Once they are down, punch out the trooper that is just visible down a hall.
Once the trooper is down, use your action key on the curiously marked piece of wall then run away, probably to recharge, before it explodes.
After it explodes, you can go through. There is a switch.
Once you get that elevator platform out of the way, you’ll be able to look down the elevator shaft to another narrow dark opening. Who knows, maybe it was there all the time. Anyway, jump down through it to get to narrow passages. There are two switches to break in that area, and ultimately you can look down to sewers.
I know three things that changed, and I’m not sure which switch did what. Firstly, there will now be an opening to an elevator shaft, though you may not recognize it, since the elevator platform is currently blocking it. Secondly, there was a half sunk unusable elevator back where you read Lysander’s Terminal. It now gives access to some sewers. Finally, from the middle room where the maser ammo came, you can now take stairs up to where you blew up the wall.
There is an air cannister outside the sewers. Don’t use it. Return to the charger and save.
Use the sewer access near the Lysander terminal. After the first turn (left), there will be fighters shooting at you. If you rush along the left, they can’t hit you cuz they are in a narrow passage. You can rush into it then punch them out safely.
Continue on, then rush into a small square room with a tall square column in the middle. Punch at the two troopers till you get them lined up. The back one will shoot up the front one. You probably won’t have time to finish the back one before you have to flee for a recharge, especially since a S’ppht will be floating down to attack.
Recharge and return. Clean up the area. Ride the elevator up. You must do a little jump in a corner into a room. There is a little room with a switch and two fighters. Don’t go in, because many other enemies will soon arrive. Instead, draw them out. Make a couple runs around the enemies to get them fighting, watching your shields, then retreat as seems necessary for a recharge and return.
Clean up. The switch just opens a big exterior window on the space station. I’m not sure what use that is to you.
Past that switch room, bear right and you’ll find a door that opens right up on your favourite yellow/air charging room. Well, you must use the switch beside the door to unlock it. Just prior to that, there is an air cannister and some ammo. So save those till after you charge. Then, if you’re fast enough after charging your air, you can get the ammo and leave the cannister.
Going eastward along the south‑most corridor, you’ll find another switch to that big window, and farther along, you’ll find a door. A short distance later, there is an opening to the right. There is a large L‑shaped area in which many fighters and troopers and one hulk will gather. One circuit around the outside should suffice then R&R. The hulk will have killed most, and will clean up the rest shortly after your return.
In this room, I found the uplink chip. There is a little passageway that forms a u‑shape connecting to the room at each end. There is a yellow charger in it, which you won’t need.
There is an air charger in the big room, which is too dangerous to use unless you kill the hulk. The hulk will need ammo to kill, or more patience than I possess, because he is too smart to let you use the door on him. So, I just let him live.
After my recharge and save, I headed back to the entry point terminal to exit to “Like home this ain't II”
I think it is supposed to have a secret exit to “Tarboi”. I have tried with those big windows open and with them closed. I tried killing the hulk. I tried shooting through the window at that bright light back from the entry point. I see there is an unexplored water passage that I can’t get to, and off the area with the big windows, there is an unexplored area. After killing the hulk, I noticed my motion sensor was active when I was using the air supply in the hulk room. Perhaps there is something outside the station that must be killed? I was sure it must be destroying the chip, but none of the vacuum‑enabled guns affected it. I even let the hulk bounce grenades off my chest right in front of the chip. It wouldn’t break.
Tarboi
I couldn’t find the secret exit to this level, so I just did a VidMaster. In other words, I held down command‑option and chose ‘new game’. That presented me with a list of all the maps. That’s great, but you start with only a pistol and two clips.
It seemed hopeless, even though I soon save the purple and save point on the ledge above me. And me without my rockets! I casually shot one of those giant exploding beetles and bemoaned my fate. Wait a minute! Next attempt, I was soon on the ledge and happily charged and saved.
So, I decided to let the Enforcers sizzle themselves against my mighty purple. Unfortunately, by the time I reached them, they had shot my down so I couldn’t withstand the sizzling as long as they could. So, charging the one to my left hand side though, I shot him twice before arriving, and he died just slightly ahead of me when he tried his sizzle technique. R&R.
Now go all the way NW. You’ll be surprised by an Enforcer at close range who will sizzle himself to death against you. Don’t read the terminal all the way through. Don’t pick up the mortar and clips that may have appeared, until you R&R.
Now surprise and sizzle another enforcer (S&S). Now grab the mortar and clips. Return & recharge.
Follow that technique with the Enforcers wandering around below. Take some shots up at the Enforcer(s) hiding on the central mound. When you’re ready, read that Terminal. You’ll teleport on to the central mound. Give the Enforcer at least one shot and he should sizzle himself to death.
Ahead is a spiral staircase leading to a teleporter. You can just take it, without worry about your health, or you can jump down nearby then R&R. Or, you can trigger the appearance of two more Enforcers by going on the spiral stairs, then jump down, R&R, and kill them, as I did.
The teleporter leads to “Like home this ain't II”, which is more evidence that the secret exit to “Tarboi” must be in “iwannavacuum II”.
Like home this ain't II
This is another entry point to the Tycho Plank, this time from Rozinante XI.
Remember how we got into the secret area and wondered what the alien device was for? Now we start in that area, and are locked inside it. There is no egress till you put the chip into that device, to give the Virus to Tycho.
This exits to “Core Wars II”
Core Wars II
There is a save point when you enter.
If you are invincible, it is probably best to jump down one of the big staircases where a Maser Bob is hiding and kill him. He’s a devil.
The “Complete Spoiler Guide”, supra, deals with Core Wars I, which may very well have been based on Core Wars II, since it describes features that don’t exist in that map. I make a few comments about that below.
So, I’ll just let you rely on those.
It exits to “With Utility Bills Like The [sic]”
With Utility Bills Like The [sic]
Must fight Maser Bobs with just red chargers through most of the level.
Indestructible Maser Turrets must be turned off by smashing switches. Most terminals show the locations of the switches.
From the 1st save point, one door goes to an elevator. Take it down, then take the first exit to the right, essentially doing a U‑turn off the elevator. That room contains the first red charger.
From the 1st save point, another door goes to a big hall which is in a + shape. There are many Maser Bobs and Pistol Bobs, some on ledges overlooking the intersection. I succeeded by going as far as the first (locked) door then picking off all the Pistol Bobs in sight. Then I raced across the intersection. Once safe, I turned back towards the intersection and approached with caution, picking off Pistol Bobs again. I was able to creep up on a Maser Bob to the right, but the main thing at this point is to race back and forth across the intersection a few times, then go save. Hopefully, they will have killed or weakened each other. Then just do maser‑strafes back and forth across the intersection. It’s wasteful but safe. I never did succeed in getting on to those ledges!
At some point you will find yourself in a large octagon. One door leads to a large ammo cache, but don’t take that until you have cleared the enemies, since it is a dead end. Another door leads to a white hall. That hall leads to a wall with a + shape cut out of it. Go through that wall to a room containing a charger. Another door from the octagon, the big one, leads to stairs. There are Maser Bobs all around. Rush down the stairs and n‑ward past a door. Creep back toward the door, pick off the pistol Bob. Maser‑strafe back and forth across the door to kill the Maser Bob. Through the door W-ward takes you to a dark area with a Maser Bob and a Yellow Cannister. You will have seen them through glass on the way here. Don’t take the Yellow Cannister till you’re ready to take the yellow charger room.
Moving east from the stairs, there is a switch under heavy maser fire. From there, a wide hall heads east. At the end of that, 2 Maser Bobs guard a yellow charger. It is not necessary to go there, but obviously pride compels you. Use the maser‑strafe, back and forth. You won’t be able to see the Bobs, but you’ll see the lights of the charger (and save point?), so use those to guide the level of your beam.
From the Octagon, past the white tunnels, there will now be a new opening to which you can jump. But a Maser Bob guards it from below, and I found I had to use a rocket to beat him, shooting at the wall behind him.
After making the jump and hitting the switch, jump down. Creep NE, killing the Maser Bob. From there, work west. Two maser turrets fire along the sides of N‑S transparent panels. Just work your forward, back and forth, waiting for the turrets to quit firing after they don’t see you for a while. Eventually you will find a red charger and save point. Use the same back‑and‑forth process to work your way to the switch, but once you break it, I suggest you duck quickly into the door heading S.
There is an exit to “Things May Happen VI” from the terminal near the 1st save point.
Things May Happen VI
Jump down the circular thing. Stand in the centre to go to Descension Factor.
Descension Factor
There is a save point near the beginning, so it’s easy. The bottom exits to “Like Home This Ain’t III”. I’m told there is an exit way back to “Hairy Legs”, that early pivotal level, probably if you return to the top.
Like Home This Ain’t III
Pretty much the same as Like Home This Ain’t I.
Leads to “Attack Of The Wheenies”
“Attack Of The Wheenies”
This level drove me insane. Aliens regenerate immediately and they are swarming everywhere.
You will quickly find a save point with a yellow charger. Don’t stop and use it. Also, the enemies won’t follow you to the big circular room in the far SE where you start up. Don’t bother using it to regroup. Fighters are in giant clumps. Don’t bother getting them to kill each other, though that is fun.
Instead, use your initial purple to race through to get that damn slow door open, then come back, charge up to yellow, save and go forth. This one is so evil that I’m actually going to include a screen shot with labels. It was all wrong turns into instant death.
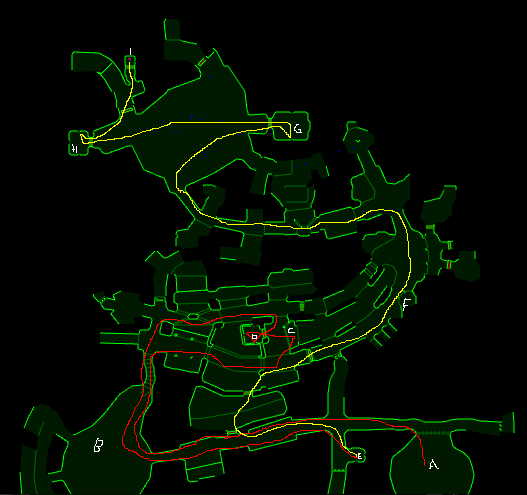
So, here are the correct turns, with no fooling around. The first circuit is in red, then next path in yellow. There may be secrets all over, I just go through it. Hulks and hordes will block and obstruct you. The rapid turns will disorient you.
A. Start Point
B. Spot where Bobs teleport in to ‘help’ you.
C. Pause here out of sight of Enforcers and Hunters while the door to D opens and you kill one of those giant Beetles.
D. Hit this switch. Sometimes you get a little pause in this room sufficient to use its yellow charger. Sometimes that just allows them to trap you inside. So, only charge if you need it.
E. They won’t follow you here unless you are in line of sight. There is a yellow charger and a save point.
F. Enforcer standing here will kill you 90% of the time as you follow the yellow path. So, it is probably best to lob a rocket up there then follow the red path back to charge and save, then try it again.
G. A door opens to this area. An Enforcer is inside, so have the AR already firing as you charge in. After he’s dead, hit the switch. In the big area outside this room, endless hordes of Troopers and Bobs lob grenades and bullets back and forth, Bobs in the centre, Troopers coming from the east, Troopers and Fighters coming from where you came in. So, watch your head as you head to H.
H. An Enforcer guards this save point and red charger and switch. I used the Bobs as shields as I approached, though in hindsight, a maser from G might be better. Perhaps it isn’t in the line of sight or perhaps it would provoke the Bobs.
I. In this little room is a switch which teleports you to “There’s No Place Like Up”
There’s No Place Like Up
You’re trapped in an elevator going down. You can take a shot at a sleeping wasp on the way. You’ll also see a terminal and save point in a tower across the way.
Once released, the first room to your left contains a save point and terminal and yellow cannister and ammo cache (?).
Tycho tells you to get to that terminal you saw on the way down. It’s a climbing level.
Good luck getting out, as hulks and others crowd in after you. The Beetles turn out to be helpful little bombs.
Leaving that room, bear SW and enter the first room. Actually, it might be helpful to take a circuit of the whole place first, because enemies teleport in when you hit certain polygons. Get them all in at once, when you’re strong, save and climb, then they’ll wipe each other out while you are too high to hit.
Anyway, in that SW-erly room, there is a door that won’t open, and an elevator. In the elevator are switches. Note their appearance because that type is used often, and it is hard to distinguish from scenery.
Hit the switch to rise. There is a door that won’t open on one side, and a narrow path on the other. Use your maser on the Fighter on the path because the path is too straight and long to dodge his shots. Follow the path. Watch out for the beetles.
There is a column near the end that looks like you can jump to it. Don’t bother. Instead, sight along it into a little room and shoot the switch in there, which exposes better jumping targets.
Jump across two. Now, if you go right, it will be right towards an Enforcer in a room three jumps over. However, if you go two jumps to the right, then turn left you can jump into a little room with a yellow charger. So, it’s probably best to jump down, save, return, kill. However, attacking from the charger room will allow you to let him sizzle himself.
Now, return to where you had turned to the right. Jump into the room. There are stairs winding up to your left, and a deadend to your right. There are many enemies, you may need to R&R. But look, you’ve found yourself looking down on that first save point inside this room!
If you go past the first opening, you can jump down and go through another opening, then jump across into another room. In that room are Enforcers and S’ppht‑Wrr. Besides a red charger, I didn’t find anything helpful. Perhaps it is an alternate path upwards. However, it’s good to clear out such powerful enemies while you have convenient escape and recharge and save points.
Return to the upper deck of the save room and take the 1st exit now. Jump across, then again to the stairs slightly to your right. There will be many wasps. Make the double jump to the ledge along the southern boundary. Many more wasps. Many enemies below. You will see a room across. You can’t jump to it, though you can do a rocket jump to it. For now, ignore it.
Go to the end of the ledge, then jump down to the right, to land on the lower ledge. Go to the left, killing your way to a purple charger, then kill your way to the right, to a save point.
As you look out, to the east, using the map, the nearest column has a notch in it. I never got on to that notch.
Jump down and go to the room NE of here. It has W-side entrance, lots of beetles. Go up the stairs. You can now see another switch in a notch cut out of a column. You can see a purple cannister too, so make note of that. Shoot the switch. That opens access to jump across columns in front of you.
Disappointingly, it seems to just take you back to that S’ppht‑Wrr Red Charger room. However, if you check your map, there is an elevator in a room not far from the second column. If you scout around on the ground, you’ll see how you have to jump around a corner a bit from the second column.
While you’re down on the ground, go into the west‑most room and clean out the Thinkers. You don’t want to fight them while climbing.
Also, return to the save room. There is now a door opened leading to shotguns and shells. An Enforcer guards them, and hulks will tend to block you in, though you can just jump into the vitriol to go around.
Then return to that stair from which you saw the purple cannister. Looking from there, you get a good view of the ledge you must jump to. So, go do that.
Now that you are in the room with the elevator, stand on it, and shoot the switch.
Bob Is Everywhere
This is the Lex Talinois Chapter. Lex means law, but what is Talinois?
The door closes behind you.
Kill all Dangi scientists. At first I didn’t like how it moved the game from morally comfortable ground of killing aliens to shooting humans on sight. But actually, the aliens are mostly intelligent creatures following orders while the humans are mostly conspirators in an evil genocidal plot.
A long narrow EW staircase has visible ledges. Open the door and grenade hope in (go straight in, fire and turn). There will be a purple, an invincible, and a secret terminal that takes you to “get over it”.
Alternately, you can let Durandal teleport you out, first into space, then into a separate Pfhorish area from which you can get to “Break The Sword”, but only if extermination is complete. Otherwise, Durandal sends you back to the start point. So, obviously you can use that to get back to the otherwise inaccessible start point.
Get Over It
This is a demonstration level, showing the new unlimited views of Aleph One.
It’s tempting to let the fighters kill themselves at length, but upcoming juggernauts make that foolish.
Instead, just race up the staircase, avoiding fighters and leap over the edge. Grab the mortar and ammo then race up the next staircase to get to the large white teleportation square at the top.
You should arrive just as your invincibility is beginning to fade.
While trying out some stuff, I noticed a bug that the grenade wasn’t having an effect. I heard it shoot, but got no hop.
Break the Sword
This is similar to “Eat The Sword” but much easier. Pfhor Hunters will even help you, and there are no juggernauts.
Get your fists out and run up the little stairs. Beat down the invisible S’ppt then read the terminal, if safe.
Tycho has sent you on to the Rozinante to destroy Durandal’s mainframe so Tycho can then destroy his ship and Durandal with it. Durandal is the sword, get it? Durandal, by various spellings, was according to legend the sword of Roland the Paladin, also known as Orlando. This is from the Matter of France. You’ll see pictures of swords all over the place. They’re clues and allusions.
Tycho makes a reference to Durandal’s original job on the Marathon, handling doors and elevators, saying that Durandal has “done what he does best” and locked everything between you and the mainframe. This is a very tough level to open up.
Hit the switch you find to begin opening up the level. You will see a platform below lowered out of the way.
Go past, not down, turn right. Hit the next switch, likewise.
You may find that it is better to leave those switches till you have conquered a charger and save point, because they can let in the drones.
Go past the elevator and rush in to beat down the S’ppht standing there. Be sure to keep him between you and the drones.
Read the terminal. Durandal is all pissy about you betraying and trying to kill him. There is a red cannister nearby.
Go up the elevator. Carefully kill the drones in the halls with your pistol, or if you can draw them near enough, with your fists.
You will find a stony maze. Carefully kill the invisible S’ppht, avoiding windows (or else drones will shoot in at you).
At the bottom of the maze is a Red Charger and a Save point.
Go eastward to where the maze opens onto one of the big open areas. There will be drones and S’ppht. Enter and retreat. Pfhor will beam in to help.
Go back up to the top of the stony maze, then south to the elevator. Jump down. Durandal will threaten you some more from the terminal in this area, and also explain what AMMDs are: Robot Bobs.
Hit the switch to lower the platform and deal with the drones. Shooting drones through the grill with masers is very effective, but expensive. Drawing them with a pistol shot then punching them out is frugal but very dangerous. Or, you can leave them till later.
When safe. run down through where the platform was, then to your left you’ll see a narrow opening. Robot Bobs and Pfhor Troopers will beam in, fight each other, then the RB survivors will fight you, but the stairs and elevators are your friends. Robot Bobs shoot grenades which hurt a lot, and bullets, which don’t hurt much but can’t really be dodged.
By the way, you can get a better position on the RB above you by going back to the base of the prior elevator.
Once clear, read the Terminal. Durandal brags of his Tycho knowledge and tells you more about AMMDs.
Take the elevator up. Go down the long hall. Mind the Rbs. Fight your way through S’ppht and drones. Turn right into a narrow and tall room. Jump down or take the stairs. Do NOT open the switch yet.
Carefully go around the corner. Lure the S’ppht around the corner and punch them down. At this point, I jump down into the trench and charge at the purple charger, then clean up the RBs down there. That’s a bit reckless.
Grab the ammo. Hit the switch, use the new opening. Looking left, you will see an open area, and a column which has a small rectangle of what looks like blue knitting. That must be smashed, but not yet.
Instead, let’s go save. Go straight ahead to the opening just before the last stairs. That switch at the top is the first one you hit in the level. Now go into the open area at your left, and then around the corner to your right. Go through the opening which you made with your second switch. Continue on till you see stairs rising.
Go up the stairs, kill the invisible S’ppht with your fists and find a save point and yellow charger.
Save and return to that blue knitting. Go into the open area to the left, then retreat from the enemies that appear. Kill them all, then smash the knitting. That will open a door in that open area.
Go through that open door. You’ll find a save point, an elevator and two locked doors. Arguably, the trip to the yellow charger was unnecessary, but it helps orient you.
Take the elevator. There will be drones and Bobs and heavy fire. If you get scared, you can jump down, run to the door beside the elevator you just took, hit the switch beside the door, and escape back into the save room. Save, charge, save and return.
There is a terminal just inside in that newly opened door. Durandal says he has located Tycho’s trinket (?), and that we lose. He offers to let you drink plasam. Decline.
Eventually hit the switch and observe a cover lowering below, revealing breakable circuitry. You might as well shoot it from here. It is the W of 4 edges of tall dividers. Break it, which opens a door below to an elevator.
Take the new elevator up. Hit the two switches. They each lower a panel, revealing breakable circuitry.
Break the S one. That opens a door below to another elevator, on the E side. Go up. Hit the switch. That lowers another panel revealing breakable circuitry.
Break the N one. That opens the 2d locked door back in the save room, releasing a bunch of RBs. I got there very fast, but there were two two closed doors in the new room that I couldn’t get open.
I think the N one also releases a bunch of RBs who had been behind a big door on the west side of the upper ledge.
You will have noted that if you stand in the correct spot, they will blow themselves up trying to shoot down at you.
Break the E one. This opens a door full of RBs and drone(s) on the west side at the bottom level. The room contains a shotgun, shells, a yellow cannister and a door I couldn’t open.
Now, return to the entrance to the maze. Go S down the hall a short way, then turn west and jump down, fists up, ready for S’ppht. Two switches are available, lowering two more platforms out of your way. Be ready for S’ppht and drones.
Might as well go save in the Red Charger room. Head north through the open area till you see the maze area.
Head out along the north side of the westmost open area and kill S’ppht. Looking up at the top NW, you will see a Clean Room Bob. I’ve always killed him, and never gotten into his room. If you find out how, let me know.
Go back to the top of the maze. Go all the way to the south end of the hall. Jump down. Follow the earlier path to the purple charger, because now we want to open that switch that we left shut previously.
Throw the switch, go to where the platform lowered, fight off the RBs in the open area to the south.
Now we must find one of those lowered platform areas where one of the columns is smooth. That is the cover to another breakable circuit. It was quite a search. Return to where we saw the Clean Room Bob. Now grenade‑hop over the big EW divider. Many drones will appear, but you can duck through a small opening right away and hide. There’s a save point, mortar and other ammo, but no actual mortar gun.
Also, you can hit a switch to a door which reveals the room where Durandal first explained AMMDs to you. From there, you can R&R as needed till you kill everything. Just inside that door frame, there are circuits that can be smashed. I have no idea what they do!
Once you lower the platform, but that is not where you’ll find the unique smooth column.
Instead, it is the platform that was revealed nearest the room where Durandal first explained AMMDs. Be sure you are charged and saved, then hit your action key and break it. This opens up the whole hollowed out giant plus sign that you have been working around for this whole time. RBs will come pouring out, and many more will wait inside to ambush you. There is lots of ammo inside. You can now move freely about the map.
But I still couldn’t get to the room where Clean Room Bob is seen, or to the high room off the east side of the southern arm of the big + sign. And that room contains an invincibility cannister and a rocket launcher! [Homer drool!]
From there, I tried 4 terminals. They were all Tycho. He set us free and left the galaxy after he wiped out Durandal, then we exited to “Lazarus Ex Machina”
Oh, I learned a funny thing as I was hunting for the effect of the circuit in the door frame. Near the start point, I finally shot off my AR, and a bunch of Pfhor Hunters appeared, ready to help out. Better late than never, I guess.
Lazarus Ex Machina
Lazarus was the guy who Jesus brought back from the dead. “Ex Machina” is Latin for ‘by Machine’. Mean European drama critics made fun of ancient Greek plays for always being solved by some God lowered on ropes, what they called “Deus Ex Machina”.
So, I think you are Jesus, Durandal is Lazarus, the Jjaro are God, and the authors are teasing themselves for putting in a happy ending with no basis whatsoever in the preceding story line.
Anyway, it’s the far, far future. Terminals have that annoying Jjaro semi‑poetry. You recover and insert two chips, then read the terminal. From chaos, it coalesces into ....
Despite myself, I was moved and pleased.
Extra Spoilers
Several non‑Tycho levels have also been added since the “Complete Rubicon Spoiler Guide”. Also, I had some things to add.
Veni Vidi Cursavi
This level was part of the improvements introduced after the Complete Spoiler Guide was written.
In Latin, it means, “I came, I saw, I ran constantly about.” It’s supposed to allude to Julius Caesar’s famously terse report, “I came. I saw. I conquered.” That’s even more terse in Latin, “Veni. Vidi. Vici.”
You can explore without any aliens as long as you want, but it is mostly locked down. You will start in some wreckage. Exit to a NS hall, go to the N end and turn right. There are two rooms connecting to a short EW hall. One of them contains an uplink chip.
Return to the NS hall. Take the E exit to a large area which you can climb.
Taking the west exit, you enter another NS hall, larger. Remember, you are on the second level now. The N‑most room contains a chip reader. Don’t use it yet.
The second room from the N contains a save point and Terminal. Use the Terminal, save, then use the chip reader. That opens doors all over the place, and starts an unending supply of aliens.
If you return to the first terminal, there is a different message, urging you to hurry, not fight. I don’t think it does anything.
Now if you go downstairs again, there is a new door to the west at the north end of the hall. There is a second pistol in there.
Moving north from the save room, there is a room with a red charger. I’m sure I have seen ammo on the raised platform in there, but I couldn’t make it appear in Vidmaster mode. From there, there is access to an EW hall. Eventually, a huge horde of Pfhor Fighters will enter from the far E end of that hall. A big door can be opened heading south off the EW hall. You can go through it S‑ward to another big door, but it just opens to the same EW hall that is at the top of that big open area you climbed up.
Also, there is a small door in that EW hall off the red charger room, leading S into a medium room. There is a terminal which just speaks gibberish. However, it opens at least one door, to that enormous room. That enormous room has a big stage you could jump to, if you only had grenades, and it has two unexplored areas visible. Unfortunately, this is the source of all or most of the incoming Fighters, so, except for exploring purposes with a saved game, just don’t use that Terminal.
On the other side of that gibberish terminal room you have access to the N‑most EW hall to date. Turn even farther N at the first turn. In the new N‑most EW hall, to the west is a door just opening and you can see a lot of Fighters teleporting in. To the east, there is a turn to go even farther N, which leads to a big hole. If you continue east instead, you will be forced around in a big circle that leads to the other side of the big hole.
Eventually, you must follow Durandal’s advice and jump down the big hole. Follow the maze around till you find an even deeper hole. Grab the ammo before you go, then leap down even farther. You will be teleported out to “Honk If You’re An Underpaid Cyborg.”
The Dotted Line
This is level 50. I don’t know where the secret entrance is to it, but it exits to “Things May Happen IV”, and the level prior to that, normally, is “iwannavacuum I”, so that is the prime suspect, especially since “iwannavacuum II” is the prime suspect for another secret exit I haven’t found.
Kind of stupid, You have to stay on the dotted line. If you don’t, an impossible number of aliens, mostly Enforcers, appear.
It’s well nigh impossible on Total Carnage, especially since I was tackling it in Vidmaster mode, with just red health and a pistol. In fact, this is the only level I didn’t finish on Total Carnage, partly because it was so hard, partly because it didn’t promise any fun.
When you are approaching a turn and can’t see it any more, turn ninety degrees and sidestep till you can line up in the new direction.
Follow the dotted line out to a save point and taunt terminal.
From there, follow it to where it climbs a wall. Note that after it hits the ceiling it comes back and turns into a room. You can follow the ceiling dotted line into the room. In other words, at the doorway, just walk in on the floor, using the ceiling line to line up.
The line leads across a garden you can’t pass. Shoot down the plants.
Now it leads to a door but past the door it stops. 4 troopers will appear when you step past the door. Unfortunately, it’s not a quick‑reverse door so you can’t “use the door”. You must just race up the stairs.
At that point, I tried Vidmaster on Kindergarten, so it was easy to punch down the enforcers and troopers in this area. After the stairs, there is a red cannister and a save point.
Follow the trail over the edge of a ledge. Follow it to a save point. Follow it past an intersection with narrow short halls which contain an invincibility. I succumbed to temptation and wrecked havoc till I died, then didn’t bother the next time.
The trail will lead over a mortar and clips, so that’s nice.
Eventually it returns to the start room and leads you to a dead end. But that is the transporter pad to exit to “Things May Happen IV”.
Hell Pfhor You
There is a spoiler for this out there, but I haven’t read it. This is for Total Carnage, of course.
When you start, charge and save.
I notice that if you lob a rocket into the barely visible ledge before jumping off, then wait about 15 seconds, that then there won’t be enemies waiting for you when you do jump off. You’ll have time to do a backward (lossless) grenade jump onto the ledge to the left and get into those tunnels.
However, instead, if you jump straight down into the lava, then follow the lava trail, you’ll find a lava wall, seemingly to the ceiling. Even so, a backward grenade jump (lossy) with bullets firing will take you to a fairly serene area.
Moving to your right, you will activate some platforms to lower, releasing some PCMs. From there, there is a switch. I think that, or a pressure sensitive polygon on the way to the switch, opens a door releasing two super hunters. However, if you retreat to the top of the lava, they won’t follow, and you can pick them off gradually. Even so, there was no immediately apparent benefit, so don’t do that yet.
There is a taunting terminal which, if not esc’d, will teleport you to a Rozinante level.
Therefore, instead move to your left with your maser out, alert for the sound of an Enforcer awakening. Immediately flee backward, using the maser to suppress fire. Once you are out of sight, you can switch to AR if you’re short on maser. They should approach. There should be 3 plus a PCM. If not, advance very cautiously till they are down.
Continuing on that path, you’ll see a ledge, apparently empty. Staying behind the corner so you can just see the left side of this ledge, keep your maser trained on it until you kill 4 Enforcers that will wander out. Be patient.
Now peeking around the corner to your left, you will see a hump, over which there is an opening. Beyond that opening are many enforcers. At this point, creep forward till you only seek the head of the first one. Kill him with the maser. He won’t be able to shoot back.
Watch to see if anybody else attacks. If not, return to the right hand stairs. Run up 2 or 3 steps and abruptly about facing, using strafe and you should be able to get onto the ledge. There will be ammo and a switch and a yellow charger. The switch doesn’t do anything apparent, but it unlocks the way to the purple charger, the save point, and all that ammo. Read the rest of the way through to spare yourself my error, or just do it the way I did.
From the yellow charger, I swam out into the lava till I heard an enforcer use his close range weapon then returned to recharge and repeat. I hoped he was hurting himself or his neighbours. I don’t think it helped.
Jump back out and with the benefit of the yellow charger, it is fairly easy to carefully dispatch the room full of enforcers.
If desperate, you can return to your original jump off point and use a double backwards rocket jump to losslessly return to the save point. Of course the double backwards rocket jump will kill you if it isn’t done just right. Also, I think this generates a lot of new enemies, and it certainly takes 2 rockets. Really, it takes 3, cuz you must clear the 3d to do it again. So I only did it once.
In the room where the Enforcers were, there is a taunting terminal. I didn’t dare see what would happen by not esc’ing out.
Anyway, past the room full of Enforcers, there are a bunch of troopers. I ran back and forth to get them fighting each other, then fled back for more yellow frequently.
Once clear, there will be a big door or doorway looking forward (call it BigDoor, and a seeming empty high stage looking back towards the enforcer room. You can not jump up, but later you can take a tunnel to it.
Back at the original place you jumped to the top of the lava, there is a switch visible across the ledge that you can shoot to open BigDoor, or re‑close it. A lot of enemies await beyond it. If you run back and forth a couple of times across that door, they should begin to fight among themselves. With my scenario, they were all wiped out.
From there, I used discarded Enforcer guns to shoot at the Juggernaut till it died. It died with my last round of Enforcer ammo.
I wandered around a little past where the juggernaut had been. I hit a switch in a hall way near where a gang of hunters had gathered. It opens and then closes a door at the top of some elevators which makes final exploration much nicer, but it is not essential. Be sure to turn it off before it re‑closes the door.
Then, when I returned to the top of the lava, I tried the right hand fork, killed the super hunters, and hit the switch, all as described earlier, and as tried in earlier attempts. This time, it lowered the platform on which all the ammo was placed. I now had access to the purple charger and the save point! Turns out, I should have done this right after I hit the switch by the yellow charger.
From there, it is just a question of whether you want to explore some more. There are a couple more ammo caches, one by a yellow charger.
I killed everything, even the second juggernaut. I’m not sure why. Unless you were like me, just going back to clean up your missed levels, it’s smarter to save your ammo.
Core Wars
The Spoiler Guide shows an E‑W tunnel just a short distance north of where you come in. I didn’t find that.
Nor could I get those two doors open on the NW side.
If you look for a door with nothing above it, ride it up. Run about on the tops of walls till you see a room with a yellow and an invincible and an ammo cache. Jumping down is the only way in.
In the lockers, there is an invincible. This seems the closest to an exit term and a save. Be sure you are done then practice the route from here to the save, before taking the invincible, because it really helps in Sucking Cherries
Sucking Cherries
You should have entered with plenty of invincible left from the Core Wars. When you leave the first room, which has a save point, you can’t get back in. Ignore the ammo and rush till you find a bunch of enemies on a ledge. Ignore them. Rush to the door to the left of the ledge (or rocket jump up). Go to the right of the ledge and hit the switch. Note but ignore the yellow charger. Jump down and head right as far as you can till the invincible wears off, then retreat fast. Turn fast down the stairs when you can, so trailing homing shots won’t get you.
Once fairly safe, work your way back to the yellow charger.
Run along left of that ledge to let a bunch of enemies teleport in. Run around once then ignore them.
As you work right‑wards, getting onto ledges, hitting switches, you will come to a large door/barrier that goes up and down. Ride it then jump to the left ledge for a purple charger. Be cautious advancing farther right, because many enemies teleport in. Hopefully you got that far with your invincible.
Eventually you get all the way around to the save point. You could have just rocket jumped to it at any point. It was just to the left of the yellow charger ledge.
One of the later switches opens a door on the circular stairs. It gives access to a large library. It has many enemies, so do a circuit of it to get it mapped and to note the enemies, then charge and save and return to clear it out.
From the library, you enter another circular hall. Just run by some AMMDs (robot Bobs with ARs), then you’ll notice massive numbers of enemies teleporting in, so just retreat back.
You will have noted that beside many of the big door‑barriers in that first circle, there are doors. And in one place, where the barrier won’t move, you can jump down an elevator shaft from above.
In those rooms, you will find a purple cannister, and I think so ammo. You will be able to rocket jump onto a ledge which contains a secret terminal which opens an alternate exit. However, it is not itself the exit. Also, it is a duplicate of another secret terminal.
Also in those rooms, you will use one terminal by a door that says your unauthorized access has been noted. Just suicide right there, because that de‑activates your purple charger. Same thing happens even after the secret terminal.
Eventually you return upstairs. Note the yellow charger discreetly placed in the bookcase. Clean up the ammo, then pistol kill the maser bob hiding in the lab. If you shoot from far enough, he doesn’t even shoot back.
Past the lab, watch out for maser bobs teleporting in behind you. Watch out for hidden doors.
Once you get to the purple charger, be sure you’re done before going up the elevator. It’s a one way trip.
In the ensuing battle, take heart that the enemies are finite.
By the save point, a terminal offers you an exit. Go past to find the secret exit to Drinking Vitriol
Drinking Vitriol
This is even harder than Wading In Vitriol, because there is more vitriol. Otherwise, they are much the same.
Run left up the stairs, jump into the lava wall, swim up to your left, as soon as you’re out, run to the left up the stairs. At the top, there is an Enforcer in a room to your right, just ahead, but several grey fighters to your right. Good luck with that, especially since the fighters in this level shoot often, hard, and with hard‑turning homing bolts.
But once you have them cleared, you can use the yellow charger in the Enforcer’s room, only occasionally having to dodge the juggernaut that shoots through the window.
In Wading In Vitriol, I ran to the save, then around behind the wall, then rushed for the charger, then repeated, until the fighters cleared themselves away from the charger. The vitriol puts the kibosh on that. Therefore, clear the fighters from the ledges across the lava with a couple missiles. Then rush the save point and back, because this will have caused many new fighters to teleport in.
Now the door to the left of the fighters’ ledges will be open to a circular room. Above it on a circular stair are many troopers. Just run around and around till there is only one left, charging and saving as needed. Finish him.
Backward double Rocket Jump onto the circular stair. Maser the Enforcer. Shotgun the Thinker. Hit the switch. Now you can open the doors to the ledges that the fighters are on, so that you can fight the fighters when they are all lined up away from you, so they kill each other.
Once they are done, clean up the surrounding area. Before you go into an area with several lava pools, lots of Hunters and a Thinker, go back and save.
From the save point, swim across the lava and on to the ledge, assuming you have cleared it sufficiently already. Clear the remainder. Then go left to the door. Within the door there is another door, then wasps and a purple cannister and an invincible and ammo. Don’t grab it till you’re sure you want to go through into that Hunter/Thinker lava pool area. If so, rush to save, then rush to invade.
When you read the terminal, a door behind you will open and a Thinker will come in. Don’t go through that door very far until you have saved and charged, and lured as many aliens through it as you can, because it will close behind you when you get to a certain point.
Eventually you see a purple charger and save point. Hidden Troopers guard it, and they are tough to lure out till you are too close to escape.
Once you have saved, look over the ledge. Those little balls shooting ferociously at you are members of the Pfhor High Council. Shoot all you can see, then rocket jump across to the opposite ledge. Do the same, rocket back and save.
When you finally jump down, and you work your way left, you will trigger the release of more enemies including S’phhtW’rr. They are very hard to fight when you can’t maneouvre for fear of the High Council, so just don’t go all the way left till all the High Council are dead.
Wading In Vitriol
See “Drinking Vitriol”. However, in this one, before you grab the purple and invincible and go to tackle the Hunter room, there is a malfunctioning secret. Take the purple and ammo, then go back out the two doors. Look up, way up. There is a switch. Shoot it. Now, after you clear the High Council at the end of the level, there will be a previously locked down, now unlocked door, behind which there is a secret terminal. Unfortunately, it is now the very same secret terminal you get when you rocket across from the purple charger.
In short, as of 090816, there is no way to get to “Blasting Cherries”, except the Vidmaster way.
Make It Better Like This
I found no access to this level in game play, but found it using Vidmaster mode.
It seemed to be a revision of “Get Over It”, with some hallways, a yellow charger, two save points, a purple cannister, and three fighting areas, not one.
Actually, besides a small bug where you can’t cut closely around a couple of corners, it did seem better!
It exits to “Things May Happen V”.
In the first section, running along the line will cause a mortar and ammo to appear. There are many fighters lining the upper rim. If you move fast, sticking to the outside with the occasional dodge should allow you to just run by them. After you climb the stairs and run around the outside, there reach the NE and NW entrances to a hall that connects them. If you run past the structure, there is a ledge that runs beside the hall, which contains two red cannisters.
In the second section, there are many Fighters and Troopers, which you just run around and between. Initially, run straight between the Fighters for the corner ahead and to the left, then follow counter‑clockwise up the stairs. The Troopers will pretty much force you to the outside edge. Your biggest problem is an Enforcer who will definitely kill you before you get to the entrance to the building. Therefore, I initially decided to snipe at the Enforcer. But Fighters from the first section pursued me into the hall, so I returned to the first section and exterminated them by running around them, punching when the opportunity arose.
Before you can snipe the Enforcer, Fighters from the second section will pursue you into the hall. However, they won’t go past the hall, so you can take a break whenever you like. They were almost all the yellow non‑shooting kind, so there was a lot of punch and retreat. Occasionally one would go berserk and do damage to his friends.
When ready, the Enforcer is high up, far off along a line almost perpendicular to the hall. Even against the back of the hall, when you can’t see him at all, he can hit you. That took the fun out of this plan, so I tried charging through again. This time, I discovered that you can again go around the building. Once behind the building, you can pause, then charge back around to enter the building. Also, there are maser batteries. Note, you can jump down on to an extra pistol and some ammo, but then you have to climb all the way up past the Enforcer again, so leave that for later.
When you get into the building, obviously duck and hide first, to let any incoming homing Enforcer rounds from finding you. Then resist the yellow charger tempation till you kill the second Enforcer around the corner. Unfortunately, Troopers will follow you in, so if you are playing in Vidmaster mode, you’ll need to use that mortar on the Enforcer.
You can save safely enough, though every time you restore you’ll have to immediately dodge. Grab the AR & ammo. This Enforcer will come to you (whew!), so give him a few secords, then wheel around the corner shooting, then get ready for the Troopers. Nobody come attack from behind unless you go all the way to the corner, so you should have no trouble. Charge & save.
Next, do circuits around the next part till they are exterminated. Do NOT pick up the purple cannister!
Go back and kill everything up to this point. Get the pistol and ammo. Do NOT get the invincibility!
I was in Vidmaster mode and I could not win if I triggered the appearance of the Juggernaut and I just didn’t have enough ammo to kill it. So, just don’t. Don’t take the stairs to the third level in this section. Use a lossless double backwards mortar jump to avoid stepping on the polygon on the stairs that makes him appear. I felt bad. I like to exterminate, uh, I mean, be thorough.
The stairs to the 4th and highest level are fine. Around the corner behind the stairs are some rockets, though you don’t have a launcher. There is also a bug. If you take those corners too fast or too close, you get disorientingly pushed to the side.
Look for the save point behind a wall on this level.
The next stage is a large area with many Fighters and Troopers and one devastating Enforcer far away and high up. Your purpose here is just to clear most of the Fighters and Troopers. Just do a little foray around the walls, carefully waiting for Enforcer bolts to arrive, since they are homing bolts. Then back up and let the Fighters and Troopers that follow you kill each other. You have lots of room to back up, since you didn’t trigger the Juggernaut.
Optionally, go back in and clear out some of the ones that didn’t follow you, because they are guarding the Enforcer or up on the high points. You can mostly arrive and escape unscathed to the shelter of the big blocks on the left and right sides, where you will be protected from the Enforcer. I fooled around with that for a while, but in hindsight, don’t feel it was helpful.
Now go back and get the Invincibility. In order to leave the level with purple, I think it is better to sacrifice more mortar shells and do it in two gos, so continue to avoid the purple.
You must really hurry with the Invincibility. So climb the stairs to the level of the purple cannister (the 2d level), then do mortar jumps up the next two levels. Rush the enforcer. You don’t have time for the stairs. Even then you still won’t reach him in time for the AR, so use the mortar on him. Once he is dead, escape and save. Return and clean up.
Go back down, get the purple, mortar jump to the 3d level. Leave the level with pride.
I saved the film of Vidmaster Victory Over Make It Better Like This. I thought. Inexplicably, it showed me playing level one, or perhaps it was the moves from this level, depicted on level one. I don’t know how to operate the saving and viewing of films, so if you do, help me out.
Bugs
“Wading In Vitriol” doesn’t exit to “Blasting Cherries”. Now, both secret terminals are the same, and both go to “Eat The Sword”. My work‑around was just to play “Blasting Cherries” in VidMaster mode, i.e., holding ‘command‑option’ when selecting ‘new game’, then choosing that level. You don’t get to bring all your weapons and ammo, but it’s do‑able.
In FUD, all weapons would stop having an effect, even fists, even alien weapons, if you went to a certain spot and caught the attention of some aliens. I saved a film. It was very reproducible there, and it happened a few times at other spots too. It must have overloaded something. My work‑around was to kill all enemies before going to that spot.
In “Get Over It”, there was a spot where the grenades quit having an effect. I didn’t check if it was reproducible.
In Make It “Better Like This”, trying to cut fine corners moves you with disorienting suddenness to the side of where you expected to be. It occurs near the top of the climb in that spot where there are two parallel sets of stairs for you to climb then jump.
To Do
Get into those two high areas in Break The Sword. Find out what breaking those circuits inside the door frame did.
Find secret exit to “Tarboi”.
Find secret exit to “Make It Better Like This”
Find secret exit to “The Dotted Line”
Figure out save film and play film.