Spoiler Guide to the
Devil In A Blue Dress Scenario
for the Aleph One (Marathon) Game Engine
© Kevin Jaques ‑ All Rights Reserved
Introduction
“Spoiler” is such a harsh word. Yes, if you read these before playing the level, you will permanently deprive yourself of much of the fun and glory of playing this great story line. But if you have done all you can, and are either hopelessly stuck or dont know whether you should go on to the next level or keep looking, then these are “Improvers”.
Devil In A Blue Dress is a (free) ‘Scenario’ for the ‘Aleph One’ ‘port’ of the ‘Marathon’ ‘Game Engine’
To understand those terms, and much of what follows, please read my Marathon/Aleph One Introduction Tips & Techniques .
The Devil In A Blue Dress Scenario was produced by the Marathon Map Makers Guild for Marathon I. Later, it was brought out for Infinity, then for Aleph One. It is the Prequel to Excalibur: Morgana’s Revenge.
They decided not to re‑do any graphics or sounds for the environments or aliens, just to re‑cast them in a different, somewhat related universe. That actually worked out well, because they then rode along when those graphics were upgraded when Marathon was ported to Aleph One.
I write to make my contribution to the great user community that made the Aleph One Engine and so many great scenarios. It is intended to help you through it when your difficulty is set to Total Carnage.
You can download this Scenario at Devil In A Blue Dress SourceForge Download . The MMMG maintains a FAQ at Devil In A Blue Dress FAQ .
Forgive my varying ‘voice’. Sometimes it is first person, sometimes second person, sometimes present tense, sometimes past tense. Sometimes that’s just bad writing. But sometimes it indicates certainty. ‘You will’ is certain. ‘I did’ indicates one possible outcome.
I just wrote this as I played through one time, so I’m sure I missed a lot. Also lots of times I caught myself writing the opposite direction to the one I meant. Indeed, it turned out to be a much bigger project than I expected and I ran out of steam before even proof-reading it. Sorry. I played it once previously, years ago, so though I had little conscious memory of it, my instincts were extremely good.
So, please be sure to send me any corrections and additions, even (especially) grammar errors, to kevinathome at hierlaw.com.
Where I still have questions about the level, I usually mark those in bold. Send those answers too, and I’ll add them, and credit you.
These are the levels in the Devil In A Blue Dress Scenario
1. Space Walk
2. Hostage
3. Who Put The Crack In The Liberty Bell?
5. Click
6. Skinner Box
11. The Pit
12. Free Falling
13. Med Lab
14. Engineering
15. Jaunt
16. Sensori Overlord
17. Galactica II
18. Tower of Babel
19. Aye Matey
21. Ambush!
22. Hackorama
23. Closing
1. Space Walk
Optionally, read the terminals that describe the premise of the Scenario.
At the bottom of the stairs, open the door and jump through. Get your pistol. You will be raised to a terminal which is the exit to “Hostage”.
2. Hostage
Use the red charger and air charger. Read the terminal. You are in Club Med Antares, and Space Pirates (Pfhor) have attacked. You have to release the Science Office. Apparently killing Bobs is discouraged. Go figure.
It took me many tries, because I am excessively frugal with ammo and it’s a long way to the next save point. Once you move into the next room, Pfhor appear, and your chargers turn off.
The trick is that there are two swamp things (Flick’ta) hurling fireballs through grates, and Pfhor shooting down at you from above, and obstacles, which can block you inconveniently (fatally). Still, you can clear it with just your fists. Don’t forget the ammo cache.
Up the stairs there is a door and an elevator. You have to be near enough the elevator to attract the Blue Pfhor below to come up. That means that you are inside the door, which will shut on you inconveniently.
Once clear, drop down, hit the switch. Now there is another exit to the Swamp Thing room.
Up those stairs, another ammo cache. Hit all switches. Back down, figure out the elevators to get into the high hall. Punch out the single purple Pfhor.
The hall has a locked door at the end, but opens to a room in the middle. Above that room, on the side you are on, are two Blue Pfhor. Across the room is an exit. When you step on that exit, a S’ppht and a Blue Pfhor will appear, and lava will fill the elevator room.
So, immediately flee towards the locked door. Get them to fight among themselves. Punch out the winner if it is S’ppht. Shoot down the winner if it is Blue.
Go back in the room and shoot down the Blue(s) above. Note
that on the map, there appear to be stairs but they can’t be seen or climbed. I never got up to where those Blues were. How
to activate the stairs and get up there?
In the halls beyond that room, there is a little ammo cache, and then a room with a terminal, in which a Purple appears and also some ammo and an AR. Punch it down. Read.
Now the locked door will open, using the switch beside it. This switch will auto‑close, so stop the switch when the door is open. Punch down the purple. Beyond that purple is a room with a walk through some lava. Don’t bother yet.
Instead, go left, punch down two Purples. You’ll see a room with a Bob. He is the Science Officer Hostage for which the level is named. You can’t enter. To your left, facing him, there is a small ammo cache and a Terminal. Read it.
Now go to the right. Eventually you’ll jump down into a room. There is a recessed switch, which must be hit with a grenade. I was unable to do so and retreat to the safe part of the room that doesn’t drop down. Quite a few Blue and Purple Pfhor will drop down on you. Your footing will be difficult during the drop, but then, though the room is a bit small for it, you can run around and punch them down.
Follow the hall. Punch down two Purples.
You will see another room into which you must jump down. A Blue will appear, and quite a few Pfhor will pour out of the doorway. After all this invested time, better use your AR, just to be sure.
In the hall beyond, there is a red charger and a save point. Use them. You won’t be able to return.
The switch lifts you into a Purple. There isn’t much room to retreat, and you’re on stairs, so gun him down.
Now you’ll be at a switch which opens the Bob’s room. I sort of forget how I went from here. At some point you cross that lava room. The Blues will be preoccupied shooting Swamp Things unless you provoke them. However, if you jump on to the ledge across the lava, many Galaxans and much shotgun ammo will appear.
You’ll go upstairs and meet the Science Officer, then teleport out with the terminal to “Who Put The Crack In The Liberty Bell?”.
I broke the two circuits near there, to no apparent
effect.
If you go back to the elevator/lava room, there is now a newly opened room, which contains a Terminal. If you failed to keep the Science Officer alive, this is your only exit. It takes you to “You That’s Who”, a sort of punishment level.
3. Who Put The Crack In The Liberty Bell?
The premise is that you are in a big recreational complex complete with two swimming areas, complete with giant divider that descends to separate them. You must clear the invaders, including a juggernaut in the pool area then get to an exit in the maintenance tunnels.
It’s a cute level. I like the Marathon version of a locker room.
The pool is at the SE, the red charger and save point are at the NE. You start at the SW near the access to the tunnels. The NW has the switch to the elevator.
It’s too cute, and too obvious, for me to tell you any more about the answer to the juggernaut.
Fully exploring the tunnels will bring you a small addition to your ammo, assuming you are using only your fists. There is a small ammo cache in the deeper pool.
Once all enemies are dead, including the juggernaut, head for the terminal in the tunnels, which will take you to “Click”.
Actually, see “You That’s Who” for more detailed tips.
4. You That’s Who
I found no entry to this level in normal game play, so I tried in in Vidmaster mode (hold down command‑option keys while selecting ‘new game’, then choose it from the list).
Later, I discovered that this is sort of a punishment level you go to from “Hostage” if you let the Science Officer die.
It is exactly like “Who Put The Crack In The Liberty Bell?”, the one you were supposed to go through, but without the charger and save point. Also, I don’t recall so many Blues. In this one, as you proceed N along the E corridor past the lockers, a large number of blues appear in that little room with the white floor and the low dividing wall.
So, punch out the two Purples on the way to the pool. That’s the first door to your right which is closed. Hit the switch. Rush down the stairs and through the fairly obvious door to your left before the Juggernaut hits you. Go only part way up the stairs or the Juggernaut will shoot you through the window. Hit the switch, to crush the Juggernaut. Wait for the blinding flash. Hit the switch again to move the pool divider out of the way again. Collect the AR and ammo from the pool.
So, when you first turn N along the E corridor past the lockers, just wait and draw the Purple towards you. Punch him out.
Rush to the Blues appear in the first room to the right. Grenade them. But don’t take any chances. There’s no charger in the level. If you retreat fast enough, most will lose interest in you and remain where they are, so you can return and grenade them in their cluster.
Once clear, follow the stairs down. Hit the switch by the stairs. Punch down the invisible Galaxan. Hit the switch in the SE.
Return to go N‑ward along the W corridor by the lockers. Go through the door. To your right is a closed door to a small room with an invisible Galaxan and nothing else. If you let him live, will he then attack you from behind? No, but it’s an extermination level, so you’ll have to go back for him.
At the end, to the left, is a room with 3 sleeping drones. Wake them and draw them into the corridor for punching out. Collect the pistol ammo from the room. Hit the switch, which activates the elevator at the Start Room.
For frugality or style, as long as you are careful to keep your retreat free of enemies, the narrow corridors let you take on one enemy at a time. They’re all Flick’ta and Drones, so if you come at them fast enough with both fists swinging, they can’t get a shot in.
Remember, there are two Flick’ta hiding to the sides in the final Terminal room. Draw them out.
5. Click
You must restore control to the inter‑level transporters by hitting 10 switches.
When you open the door, there are little flying things followed by a Purple and two Blues. They pop, spraying poison when they die. I don’t know their names. They were present on Lh'owon, the home world of the S’pht. I’ll call them Flutterbyes.
There are some bullets in the first round room. If you go through the door, several Blues will teleport in, so you may find it convenient to do that before killing the first bunch.
The 1st switch is nearby, then a red charger, which an AR and some ammo.
I love the effect. You’re feeling good, with ammo and a charger. A few enemies plod up, and you almost contemptuously dispatch them. But then they keep coming, till they are a bother. And they start coming more and more plentifully, and your emotions gradually move up the continuum to ‘Holy Crap!’ and you flee but are then trapped and crushed.
There is a door, but it opens from the top and is too fast to use as a weapon. So, my solution was to run by everything down the stairs then through the door at the bottom. They won’t make the jump to follow you. Just outside the next door is a save point. Use it then retreat, cowering behind the door, flicking it open and closed to promote in‑fighting. Once clear, you’ll have only a sliver of health but a strong foothold.
Hit the switch. Up the stairs. Punch down the appearing blue. Hit the 2 switches. Save. Rush through the hall, through the door, and close it behind you. Use the door. Eventually, it will seem clear, but actually, the enemy will have dropped back to guard the save point. Rush through to where you first used a door as a weapon, then clear the area again.
Moving on, there is a little ammo in an alcove, and a Terminal. Merlin, the Club Med AI, has learned that the Pirates intend to attack a poorly defended Patrol Station.
Punch out the lights to move through narrow doors. The troopers will be preoccuppied with fighting flutterbyes, so you should be able to gradually clear them with pistols. If one does pursue, watch out for that door that shut behind you.
Once they are clear, you must jump down. You’ll be at the tip of a heart‑shaped hallway. Move either way quickly till you hear enemies beaming in. You’ll only have a sliver of health and there will be many troopers and if you let them fire while you are in line of sight, you’ll probably die. So, use the AR, both triggers, appropriately, the bullets to freeze the ones in front, the grenades to push them back and to hit them when they are slightly behind the corner. You must watch your ammo, and when either is low, retreat, clear the clip, then continue. Don’t try to advance. Just try to retreat very slowly. Watch the motion sensor, so you start the grenades just before they come into sight around corners, and to ensure none come from behind. I had to try many times.
There is a hall that bisects the heart. Go the long way to hit the two switches. Then go the short way, to be teleported back to that first red charger, back when you felt confident. Charge and hit the switches this time.
Oddly, the original terminal is now covered up, but still active. The original right‑side door still won’t open if you have missed any switches, otherwise, it will already be open.
When you go through, many S’pht, including invisible ones, will attack. The narrow halls would be a great place to use your fists. They’re not quite narrow enough, so be prepared to back up, and even rush back to the charger as necessary.
Go back and save. Make sure you picked up the ammo in the sludge at the bottom of the stairs.
Now return to use the Terminal to exit to “Skinner Box”
6. Skinner Box
Merlin changed his mind. He decided to send you to a maintenance area.
Skinner is a famous psychological researcher. His boxes tested learning in lower animals by providing rewards and punishments according to their actions and often featured mazes, to test memory. Hey, who’s a lower animal?
Indeed, it’s a big maze, with many enemies happy to punish you. And there is a yellow charger, to reward you. I won’t say how to reach the latter, except that it is a small opening in a very big room filled with many enemies. I did a couple of laps so they would be concentrating on fighting each other, then slipped in. It is essential to not get trapped in there, so watch your motion sensor, and if necessary, use your AR to force your way out.
The first little hall is a crusher, containing some fusion ammo. Rush through and save.
Eventually you find a terminal, which explains that you are in the Engineering Centre, and that you must fix it before Merlin can transport you to help the Patrol Station. The terminal gives pretty good hints to the recharger, and complex directions to the rest.
Firstly, ensure you hit the switch in the big room with the yellow charger. Then head north from the terminal.
There’s a big fight in a room with rising stairs. After that, I noticed I had a fusion pistol and a second pistol.
Off the stair room is a short hall with a switch (A). Just beyond that is a platform that will rise up and down. I don’t know if it will yet, because I did the stair part first.
Figure out how to raise and lower the stairs. At the top of the stairs, you can see a switch to flip with a grenade. That will rearrange the stairs to take you up another level. I cleared it out, then dropped down to a little alcove (A) above the stair room. From it, I jumped to another hall. It contained a door. If you hit Switch A, it will be open, otherwise locked.
Once the platform is going, lure down the Fighters so you can punch them out in the stair room. Then go east to a little room fusion ammo and with a cool view of the exterior, which contains tantalizing ammo. Mouth‑watering ammo?
On the west of the platform, punch out some S’pht Compilers then hit a switch. That will open a little alcove in the tunnels above the stairs in which there are two Troopers and another switch.
Now when you jump down to Alcove A, the door will be open. There will be troopers at least. Past them, there is a jump down to a small square of lava, and past that, a raised square of lava. The raised one doesn’t really hurt, and you don’t sink in either of them. There is a platform that can take you back up, but it is infrequent, so stay up till you clear the enemies below. The Compiler won’t go past the platform, but will ride up and down.
Past that, there is a hall with quite a bit of ammo, and a red charger. Beyond it is a door to many powerful enemies, including Blue Hunters, Troopers, Compilers, and those tank‑like creatures. So, probably it’s best to just run around and return. Be careful before going by narrow areas, because there are so many enemies, they can trap you. Eventually I led all the enemies to the Blue Hunter and let him dispatch them while they weakened him. Then I finished him with my fusion pistol. YMMV.
In this area, there is an inner circuit and an outer circuit which join at the south edge, which contains the red charger entrance. The outer teleporter takes you to the inner area, and the other takes you back to the red charger at the entrance. There are two switches. I think the first gives you access to the second. The second opens access to a new area below. Try to lure up the two Compilers before jumping down.
You can jump across the opening, but it’s easy to miss and fall.
Once you fall or jump down, you retreat back to your yellow charger, but there is a new save point to the west, guarded by a Compiler. Punch him down and save.
To the east, there is a large room with a narrow hall off to your right. A Hunter is within. Wake him with a punch to lure him out. More Hunters and Troopers arrive. Stir them and lure them west, then rush down the hall at the far NE. A Blue Fighter will block your path. Let him follow you back to where the hall widens. That will be tight, because Hunters and Troopers will be just arriving. You might have to use ammo. Once he is in the wider part, go past him and you’ll soon be in a teleporter that takes you back to the stair room.
The stair room now has a new opening. Troopers are inside. Past them, it opens to a sniper’s ledge far above a large room. You can see motionless enemies on ledges below you, and Troopers on the ground. Some of the Troopers grenades can hit you, but mostly you can pick off the motionless enemies with pistols while the ones on the ground hurt themselves with their grenades.
Don’t jump down, because you still have to explore that hall the Hunter was guarding in the NE room below. That might take two tries, because there are more Hunters blocking that hall, and likely surviving Hunters and Troopers in the room.
How disappointing! On my third try, I found several Troopers and Hunters guarding still deeper points of that hall, so I lost patience and gunned them down with the AR. All I found were some shotgun shells and a teleporter back to the red charger entrance.
So, get back to the sniper’s ledge. If you check the map, you’ll see a little alcove just to your right. If you do a turning jump, you can get into it. There is a Trooper inside, but a decent ammo cache rewards you. Plus, you can jump back and go recharge and save.
Ok, now jump down. I found a fusion cartridge on the ground. Use the rising platforms. I found it difficult to jump to the yellow charger from the rising platform. So, I worked my way to the rightmost platform and jumped to the high ledge which forms a U-shape around the room. However, you can also jump into that teleporter at the end of the Platform Room and it takes you to the U‑Ledge.
In the U‑Ledge, there were many Blue and Purple Fighters, but the area is large enough to defeat them without ammo. But if you have trouble, jump off or use the teleporter, which takes you back to the sniper ledge. On this ledge, there is also save point, and I found that a turning jump down to the yellow charger worked first try.
That U-Ledge also contains a doorway to an area which forks in 3 directions. To your left, it is a dead‑end. The centre leads to a double‑door. The first door opens as you approach. The second door won’t open, so the first door crushes you a bit. So, obviously go to your right, which leads to a jump‑down.
This spot is a good puzzle. First, kill the Fighters and invisible Compiler. Then you’ll see a hall leading to a room full of Bobs. In hindsight, I should have postponed going and looking, because then they come out and wander around in the way. You have to avoid killing Bobs, while separating out and killing the exploding fake‑Bobs.
There is a fast‑rising platform that is activated when you step on it. It will hurt you a bit when it reaches the top, so try to jump off before that. To go across it without banging your head, do it in two turning maneoevres. For instance, to cross it to the north, go north half way then turn west, wait for it to go down, then go on it again and turn north.
You can use platform to return to the upper level to R&R.
You’ll see that the dead‑end was a platform. Once lowered, there is a hall. But how to get into that hall? The jump is difficult or impossible.
Select the following text to see the solution: Use the fusion pistol’s second trigger to store up an extra big shot, then shoot the switch while standing on the platform.
As you follow that hall, you’ll awaken a room densely packed with all kinds of enemies. Run away and jump down. If you stand immediately below, the Troopers will stupidly use their grenades till everybody that came to the edge is dead.
At the end of the hall is a switch. You can backward jump up to a little ledge, but it didn’t seem to achieve anything. The switch opens the second of the double‑doors.
If you go through the double‑doors, you’ll be locked in with the exit terminal, which takes you to “Let the Lava Lead You”.
This was a great level!
7. Let the Lava Lead You
Merlin is still trying to get enough control to drain lava, and he figures it’s the pesky alien infestation stopping him, so you must exterminate them.
You start in a small room with a terminal and save point. Merlin said there was a charger, but I didn’t find it.
You can open and close one wall. It will auto‑close, so be careful. Below is a room with platforms and lava. Once you go through, many aliens will appear, so if you jumped down, you’ll be forced into the lava. It is possible to draw them out of the door way then race through. However, I prefer to just jump in and out of the upper room, then try to get them to fight each other. The flying ones, the drones and Compilers, can be drawn up into your room a few at a time for dispatching with fists. I’m pretty sure I crushed a drone with the closing wall.
Grenades will knock Fighters into the lava, but not budge Hunters.
Just past the doorway are many trapped Bobs. They’re fake, kill one for an amusing chain reaction.
Past them are many dozing enemies. They do wake, so rush through. They didn’t seem to pursue.
You’ll come to a stairway with dozing Blue Fighters. They don’t seem to wake until you step on to their level, so you can punch them down.
Past the stairs are Troopers. Rushing up can get you hurt. There is a red charger and a save point, but you must first dispatch the Troopers. Turns out, they won’t leave their area, so if you go far enough down the stairs, you can hit them with a pistol but they can’t hit you.
Past the save point, you’ll see a white area with a ledge above it, past a door. Ignored the door for now. You can barely see a Trooper, but you won’t be able to wake him. Lots of compilers are above. Don’t go in too far, or they’ll trap you. They won’t go past the white area. So, draw them and punch them, occasionally retreating. When you retreat, they shoot homing bolts, so turn around and race back and around the corner.
Now enter the ignored door. Collect the ammo. Mind the Trooper that teleports in. Find the hidden door to where the Compilers were. Explore it. I think you must kill the sleepy Trooper.
Jump down to teleport back to the original lava room with the platforms.
There is a curious spot on the map, just opposite a little window. The map shows no wall, but I couldn’t seem to open or enter.
Finish off those enemies you originally ran by, near the fake Bobs. Once done, grenade hop up on to the ledge where you can see a rocket and a purple charger.
Ignore the name of the level. Do not wade about in the lava several times looking for a secret door. Instead, return to where the Compilers were, and this time, climb to the top. Eventually you will be on a transporter platform, which takes you to a small room with stairs rising around it on two sides (tank room), and MANY enemies including tanks. Defeat them, then climb up to the purple charger. I killed them all in one try, with less than full red shields (because I had searched the lava), by running around the bottom while they hurt each other.
Now, obey the name of the level. Kill the Compilers and Drones with grenades unless your patience for punching exceeds mine. Then rush along the lava. Just before the jump down, there is a safe platform to gather yourself and notice the switch just behind you. Use it.
Rush along to the next safe platform. Beyond this door are many enemies including Enforcers. Use the door to destroy most then clean up the last few yourself.
You will see a trapped Flick’ta and two stony alcoves.
I took the right most alcove and teleported to “With A Little Help”.
Another great level!
I returned later to try the left side. That’s the one I should have taken. It teleports you into the ducts with that Flick’ta. Get your fists out, and follow the hall. Pick up fusion ammo, and a fusion pistol if you don’t already have one. Punch down a series of drones. At the end, there is a secret door which leads into a room with more ammo. Similar to the first room, it has a wall that opens, looking down on that lava room.
But where’s the terminal that was here before? Check your map. You are beside the very first room. If you hang out the edge, you can open up the very first room and jump into it. Use the save point.
On re‑reading that first terminal, it tells you the locations that the different sides teleport you. And I recall now that in my first reading, I noticed that the map it displays appeared to have a path to the right of the original room leading to the final room. I assumed it was down in the lava, due to the name of the level. Very funny! They got me!
Still, it doesn’t seem like you could skip the whole level, even if you wanted to, though you could clean out that final room, with all the Enforcers, before your run through the lava.
That’s even better and I already thought the level was great!
But then I wondered, what did that switch in the lava do? I had noticed that the locked door at the bottom of the tank room connects on the map with a locked door in the room shortly after the Platform Lava room. Nope, that wasn’t it. Is there a way to unlock that?
However, now my map shows a branch in the lava passage. So, I purple charged and swam down, along, and up. I emerged in a room with a switch and an invincibility cannister. I hit the switch, grabbed the cannister, and headed back to the Tank Room. The door was still locked. So, what does that switch do?
At least the invincibility let me leave the level in with triple shields, but it felt wasted. I’m still missing something!
8. With A Little Help
You will be in a small room with a terminal. Move about, till a huge ammo cache appears, including a shotgun! Read the terminal. Ride the elevator down.
To your right is a dead end. To your left is an EW Hall. In it, the first right is to a room with a yellow charger. Many Purple Fighters will appear and they pour down on you from above twice in this room. You may want to save them, because there is an upcoming killing ground that is marvellous.
Continuing down the EW hall, to your left is a large room in which many enemies will confront you. As usual, running around them defeats them. There is a switch which seems to do nothing, though around that time, a platform rose with two Troopers on it. There is a cache of shotgun shells. Above you, there is a mysterious platform with a terminal.
Again, you may want to save them for the big killing ground.
The next right turn off the EW hall takes you into a small room with a terminal which spells out the remainder of the level. You’ll need to keep Bobs alive so they can open doors for you. On the map, you’ll notice what looks like a little area beyond the east wall of the room. I couldn’t get into it. There is also an unexplained light patch on the floor. Does it activate something?
Beyond the terminal room is a large EW room. There is a long horizontal window looking out onto lava. Beyond the lava there is a high ledge which contains dozens of Blue Fighters. In the room are dozens of Purples, plus whatever your lured in after you. By moving slowly along in front of the window, the shots from the Blue Fighters will simply hail into the room, massacring the enemies trudging after you.
This level is great for that room alone!
Since I didn’t want those Blues firing into Bobs, I cleared them off with some grenades and pistol shots when I was done with them.
You will have seen Bobs on the map behind the far end door of the EW hall. That’s locked. Instead, shoot the switch up where the Blues were. If all the Blues are dead, the Bobs will just stand around. I shot one to get him to move. It turns out that if you shoot near them, that is sufficient. Also, see if you can herd them all down the stairs.
At any rate, some Bob will finally wander down to the very end and unlock that former dead end near your initial elevator ride. Do not get distracted clearing out drones from behind that grate above and behind that door, because Tanks and Troopers are even now decimating your Bobs. Hurry!
I only saved two.
Do clean up the drones behind the grate now.
At the top of the stairs, there was a large ammo cache in a room near the of the ledge the Blues had been on. I went down to the other end of the ledge, and in a corresponding position, I found a hidden door to another ammo cache. Purple Fighters teleport in.
The ledge leads into a circular hall, in which there are tanks and drones. I led them out, for a better tactical position. Don’t do that. The retarded Bobs will want to ‘help’.
Make sure you step on all the polygons in the circle, ideally when the Bobs are out of sight, and quickly kill all the Purple Fighters that appear.
Use the switch to raise and lower a big bridge. It is possible, but tricky, to get back over it. Select the following text to see: The switch has to be hit twice to change it. So, standing beside the switch, bring the bridge to the top. Hit the switch once, then proceed to the end. Use your second trigger on the fusion pistol to build up a charge, then shoot the switch. Turn around and jump through.
To the left of the bridge, the first door opens to a save point. I suggest using it even under fire. Once you R&R, go around the whole upper circle, punching Purples and pistol‑shooting Flutterbyes.
The second room opens to a hall with some Fighters, then the room full of compilers you saw from the Save Room. An invisible Compiler attacks. Punch him down. The others seem placide.
The first terminal on the right is funny. The Compiler is reading a junk email with a spurious joke warning about the ‘good times virus’. Who knew? Even Compilers get spam!
The next is more of the same, this time about your final chance to enter the Galactic Lottery. The next is a chain letter promising you’ll get rich quick with their pyramid scheme. It’s funny, the guys on the level above you hail variously from Earth, the Marathon, and there’s a couple of alien names from Lh’owen.
The next room contains a yellow charger. Lots of Hunters and Fighters beam in.
It turns out, you made a horrible mistake saving after you hit the switch in the Compiler room. It turns out that the circular hall where you are keeping your Bob‑Preserve is actually built around a giant platform that goes up and down. Troopers are even now killing your Bobs. Hurry!
Happily, new Bobs keep appearing.
I used the elevator to frugally kill the Troopers and Fighters down below. Once clear, you go through one square room, then another. In that one, there is a secret door on the west side of the square column in the middle. It contains an elevator. At the bottom, there is a switch and two circuits. I flipped the switch 3 times and broke both circuits.
Past the second square room, there is a EW hall. There is a puzzling little alcove. I swear I heard a door closing as I approached it the first time.
At the end of the hall is a door that re‑connects you with that first EW hall, which contains the yellow charger room. It will shut and lock behind you.
I went to charge and save, and discovered that the big pools of lava are now drained. Presumably one of the broken circuits or the switch did so.
How does one follow that lava passage visible on the map? Turns out, there is a secret terminal, the Squeaky Terminal. I won’t tell you exactly how to get to it. But after you find it and get back, you’ll know.
There is no great reward for finding the Squeaky Terminal, but I suppose there was a reward on the way to the terminal, because I found rocket launchers and several rockets! I had to fight a couple Blue Fighters, figure out two switches, and defeat a Blue Hunter. As you know, Blue Hunters do a lot of damage when they die because they explode. I will say this, when you leave the lava, don’t miss the jump to the right on to the ledge, because I couldn’t find a way up and had to suicide. I will also say this. There is no way back to this area. So, if you want to explore the lava around where the rockets appear, kill the tank first and return the short way, possibly grabbing the yellow first.
After I returned and saved, I noticed that the lava was back. I went down the secret elevator in the square again and hit the switch. Now the lava was gone again under the stairs, but not under the bridge, so we know what the switch does and one of the broken circuits. What does the other do?
Also, on the way to the Secret Terminal, some Blues shoot down at you from a ledge. There is a room beyond the ledge. When the lava is back, you can swim through lava to get to that ledge, then die immediately. I saw nothing amazing. Is there a point to that room?
Remember that alcove where I thought I heard something? A Bob must open it for you. I had some luck drawing one by making a noise with my pistol. Merlin told you that this was the point after which you no longer need the Bobs. Now that’s cold! Surely you wouldn’t!
Once through, there is a puzzle in the form of a series of 9 elevators. Your goal is to go E from the E hexagon, onto the mysterious platform we saw very early in the level, with the terminal. Select the following text for the answer:
I’m hazy
myself. I know that stepping on polygons activates them and I know that you
have a limited time and/or number of tries before you must go back to try
again.
There
are 9 hexagons in a square grid. I will refer to them as Centre, N, S, E, W,
NE, NW, SE, SW. They have alcoves. I will refer to them either by a single
direction, meaning from the perspective of the hexagon that I am discussing, or
referring to the two hexagons they connect. So, the E alcove of the NW hexagon,
is also known as the NW‑N alcove.
NW - You
enter the NW one facing S. Most are actually elevators, but not this one. If
you can’t see down to the W hexagon, run in and out of the alcove and wait. The
W hexagon will drop. Jump down into the W hexagon.
W - Kill
the enemies. Hit the switch then keep trying to go S‑ward as the platform rises
to you don’t miss your exit into the alcove between the W platform and the SW
platform.
SW -
From there, run to the alcove between the SW platform and the S platform (the
SW‑S alcove). From there, you can look down and see the S‑SE alcove and the
S‑Centre alcove.
SE - I
don’t think the SE platform does anything for you, but you can check it out.
S - The
S platform goes up and down by itself, at intervals. Go to the S‑Centre alcove.
Centre ‑
Both west and east alcoves teleport you back to the NW, so don’t use them. Jump
down to the Centre‑N alcove.
N ‑ From
the Centre‑N alcove, you can see that the N hexagon is an elevator, and it has
5 alcoves, an extra one to the NW. Purples beam in. I watched too long. It
rose, blocking my view, and wouldn’t come down. Now the Centre one wasn’t
moving either, so I used the Centre‑W alcove to teleport back to NW, then did
it again, faster. If you jump into the N hexagon, it will rise to the top and
then drop and then rise once more, and stop. You can enter the NW alcove from
the top of its motion. The NW alcove doesn’t open to anything, but from there,
you can jump to the W alcove (aka the N‑NW alcove), but that just returns you
to the NW. Once again, I was blocked, so I had to do the whole route again. The
N alcove just teleports you back to the NW. So, once more, then use the E‑NE
alcove.
NE ‑ You
can ride to the top and enter the N alcove. It seems to connect to the EW hall,
but it doesn’t open. At some point, a Trooper will teleport into it. The
elevator will soon drop again. There is no E alcove. This platform will rise
when you step on it, then drop when you get on to either the N or S alcove, or
maybe it just drops automatically.
E ‑ This
quits moving. You either have a very short time to go east, or just one try. If
you don’t make it, you can start it up again by riding the NE elevator.
Once onto the mysterious platform, there is a switch in the alcove, a switch ahead, a terminal, and a Compiler. The Compiler is placid, but he did take one shot at me when I touched him, then cooled off. The switch ahead lowers the platform. Now you learn that the previously mysterious switch will raise the platform. So, lower it, go RSR (recharge, save, return). The terminal takes you to “Bavarians At The Gate”.
9. Bavarians At The Gate
This starts the “Treachery” Chapter.
Is the title funny? I’ve heard the expression, “Barbarians At The Gate”. Bavarians are from an extremely quaint area of Germany called Bavaria. Think of the movie, “Heidi” for the look and feel, though Heidi was set in Switzerland. Not so scary when you think of it that way.
You’re in Rock Island Space Port, but it’s already infested. Punch down Fighters while Troopers in ledges above hurt themselves with grenades. You’ll find a nice ammo cache and a terminal. The terminal gives directions. You have to use local teleporting to turn off some force fields, to get the big teleporter working again.
The AI here is Mithrandir. That’s Gandalf’s Elven name. Another wizard, eh?
From the Terminal Room, one way leads back, one way leads to a dead‑end, blocked by an elevator, and the other way leads to a large room with many enemies. Run around then finish them off. Be cautious about leaving this room to escape because there are three doorways, and two are dead‑ends. One of those does contain a red charger. Also be cautious about short‑cuts through the centre, because force‑fields bounce you back. If you must use the charger, draw the enemy to the far side, then rush for it. If you must escape, use the map to ensure you have the right one.
By the way, sometimes a platform blocks the red charger. Go to the end of the other dead‑end hall. That should open it.
Once clear, you’ll see four sets of four posts in a square of squares. Within the small square, you’ll teleport. One will take you inside the centre, where a hostile Flick’ta awaits, so have your AR up. There is a save point and two switches in the centre.
Predictably, go to where it was blocked before (Platform A) and follow it allow. Many Fighters appear, with lots of Blues, so you can easily make them in‑fight and just clean up the remainder with your fists. You’ll find two ammo caches and a terminal on the main level.
You can go up some stairs and find your way to the ledge about the room with the save point. There is a Compiler and a Purple there to clean up. Be careful not to drop down the jump (Drop A) in the hall leading off NW from this ledge. At least not yet.
At platform A, there is a rather complex jump to get onto one of the side ledges. Or, you can do a fairly challenging grenade jump onto a ledge from the top of the stairs. The right hand side (S) one leads to a secret door where all those Fighters had been. Once you know where that door is, you can quit fussing with the difficult jump.
You can jump back and forth between the ledges if you extend your range using sidestep. Read my tips again about that.
At the SW end, there is a purple cannister and a yellow
charger and a locked door. Avoid the cannister. Can the locked door ever be
opened?
The terminal contains a clue to the location of a secret door that leads to an EW passage north of Platform A. I found no use for it. I guess it avoids the necessity of the tricky jump because it drops you down on to the ledge to the north of Platform A. Is there another use?
From the terminal, looking up and to the north you’ll see a high ledge with rockets. Don’t worry, in the next area, you’ll come to those.
From that high ledge with the rockets, follow the east wall to the south end. You’ll see a high door. Don’t bother rocket jumping up. It’s locked. Can the locked door ever be opened?
Save, collect your purple, then perform Drop A. Moving all the way west, you’ll find a Compiler guarding the exit Terminal. The hall is too narrow to dodge, but you can reach a corner before his shot hits you, then wait for him around the corner.
Moving all the way east, you’ll find a long room with two Flick’ta and several Fighters. At the end of that is a very recalcitrant elevator. If you go immediately and sit on it, waiting for it to move, the Enemies will hurt you. Bad. If you kill the enemies, you’ll have lost your chance, I think.
I got up there using a technique described in my tips and techniques section. There, I found some rocket ammo and the secret Apology Terminal. At least I was able to jump down and save before exiting the level.
Now, use the exit terminal, which says you are needed to eliminate several large alien infestations, then takes you to “Let’s Get Out Of Here!”
10. Let’s Get Out Of Here!
You start in a quiet, closed room with a Terminal. It says you must get some emergency doors working then go outside through an airlock, so Mithrandir can teleport you away.
Mithrandir says the crew is interrogating two pirates in Cryogenics. So, to kill them, or not to kill them, that is the question?
There are clear directions to Cryogenics and to the Recreation Area. The Save Point is off the latter, but it warns that it is unreliable.
It suggests you follow the trail of blood.
You will note a pool, well, sewage treatment, in the map depicted in the Terminal. By the pool is a small teleporter, which takes you on to the narrow ledge around the pool. The ledge has quite a bit of ammo. That is helpful, since enemies will be surrounding you. In the pool, there is a Flick’ta. If you jump or fall into the pool, step on the ‘secret’ panel to find the secret door that opens to release you from the pool.
On leaving, the first right turn leads to some Fighters and an ammo cache. You can punch them down without retreating too far and thereby stirring up the many enemies by the pool.
In Cryogenics, some ammo appears, and there are two Bobs. There are circuits which can be broken. Break the circuits? I did. They have two tanks imprisoned. There are two cabinets. They contain only two Flutterbyes.
The Recreation Area appears as promised. Predictably, there are lots of enemies. Fighters and Troopers are on the ground and several Hunters are on a ledge and are reluctant to jump down, so they make it tougher. Even so, the save point appears as promised. There are three halls leading off. Each leads to another strong contingent of enemies, so be sure you’ll be able to retreat before entering.
One of those has a red charger. The other has an ammo cache. If you grenade hop up to the ledge the Hunters were on, there is some fusion ammo.
You had to jump down to get in, but have no fear. A section of wall comes down, exposing a switch. The switch opens a door back to the hall by Cryogenics.
To the west of the pool, there is a room with an ammo cache, but 4 Hunters beam in.
To the north, a hall runs to an elevator. The elevator has 6 halls running off it. I’ll refer to them from the perspective of the elevator.
S‑Hall - You arrived on the elevator from this hall.
NW‑Hall ‑ Leads to a room with many placid Compilers. If you touch any of them, they’ll attack. A Terminal tells you how to find a yellow charger in the next part, and tells you how to open the W‑Hall now (with a switch in this room). Then it says you failed the retinal scan. Different result if circuits not broken? Another terminal tells you there are rockets off the NE Hall!
E‑Hall ‑ Leads to a small room with a Blue Fighter and a nice example of 5‑D map making. Watch the central column as you side‑step around it. Go down the impossible hallway to the next area, which contains another 5‑D section. You’re in a room with a little machine in the centre, rising and falling. There are exits on the 4 compass points, to a hall that circles the room. It sure resembles where the yellow charger was promised. But once in the hall, where are the 4 doors? There are only 2 doors? It’s impossible! If you go out west or south, you’ll be in a hall that only re‑enters to the west or south. Actually, it fries my brain. I tried to analyze it, but it’s really tough to know where you started from. At any rate, as you run around in confusion, you’ll eventually arrive in a version of the centre room which has a switch. Hit it, and you’ll be attacked by Troopers and Compilers. Then Fighters arrrive.
Luckily, I got killed, so I tried it fresh and got it straight. Amusingly, in retrospect, I see the Terminal had given me a very good clue: “Follow the trail of blood!”.
Original version of the centre room:
I took the east door. It leads to a hall that goes all the way around. The east door leads back into the original version. The west door leads into the version with the switch.
You can recognize this centre room because the north door leads north, not to the encircling hall. It returns you to the 1st 5‑D area.
If you take the west or south doors from the original version of the centre room, the encircling hall only has west and south doors and they both return you to the original version.
Switch Version of the Centre Room
N and S doors leads to a hall that goes all the way around. This hall contains the yellow charger.
W door leads to the hall that connects with the original version of the centre room.
E door leads to a short NS hall containing two Blues and some ammo. What the heck, is this 6‑D space?
The switch opens up N and S walls in the hall that connects the two versions of the centre room. They give you access to a metallic looking hall that encircles the encircling hall. It contained a lot of enemies you have already dealt with and some ammo. It also serves the purpose of giving an identifying feature to the version of the encirling hall that connects the two versions of the centre room.
Actually, when I couldn’t get the N‑Hall door open, I looked online, and it said to make sure to hit all the switches in this area. I returned and hit the switch, and then the N‑Hall door opened. So, I’m not sure. Are there two versions of the Switch Version? Did I just hit it twice accidentally previously? If so, something else must have opened the N & S walls, perhaps a polygon. Figure this out.
W‑Hall ‑ Leads to a door which must be unlocked in the NW‑Hall. You must jump down and defeat many enemies in a big room. It is complicated by the fact that there are many light patches. If you pause on any of them, you will be teleported to another point in the room. One of them (the central southern one) will teleport you back up to where you jumped down. There is a switch. What does it do? It doesn’t open the door on the N hall.
NE‑Hall ‑ This way be rockets! You must jump down. There will be Bobs ‘helping’. You can jump down a central shaft. At the bottom of that are fearsome Blue Hunters and at least one cache of rockets and a rocket launcher. There is a switch that raises you rapidly back up. The advantage is that if you bring the Blue Hunters up to the main floor, you can add them to the mix of in‑fighting among your enemies. The disadvantage is that you’ll have no time to explore the bottom and once it comes up, it won’t go back down! Did I miss anything? Now find the switch on the level it comes up to, on the outside wall. It will very slowly activate the elevator you jumped past on the way in, so go there, try to survive till you escape. R&R. Now find the switch and ammo cache inside the structure in the middle.
N‑Hall - the highest, the shortest, leading to a locked door until you flip the switch in the E‑Hall. It leads to a T‑Junction where you see several Bobs. Draw the fake one back towards the elevator then kill it. Pick up the ammo cache.
Go out the air lock to the exterior of this space station. Read the exit Terminal, which is rather funny. It takes you to “The Pit”
11. The Pit
Kill a couple of Purples that appear, then read the Terminal. It explains. You are in the main power generating station. You are on a mission of extermination, but you must also find and insert two uplink chips. It promises plenty of ammo.
The Terminal gives remarkably clear directions. So clear, I paid no attention.
Note that you can see down to a yellow charger and a Trooper through a railing by the stairs by the Terminal. You might want to let him hurt himself with his own grenades, though he can hurt you if you’re not careful. You may even wish to take a few pistol shots.
Up the stairs there is a save point and several Fighters. Some Troopers appear, but from where? That’s a clue to a secret door, behind which there is another secret door, which is tricky to operate. Behind that is an uplink receptacle.
Around to the left from the Terminal, there is a hall with a door and a switch. The door reveals some stairs down to a small room with a single Blue Fighter. It’s a trick. More Fighters and a Hunter beam in. However, the room also contains a cupboard with an uplink chip.
The switch in the hall opens the end door (platform). Through it, a Hunter and some Fighters attack.
As you pass the platform, 2 Blues jump down, and some Flick’ta come from below to attack.
I didn’t catch on till later, even though I made specific note that the door was a platform, that you can ride it up. There’s an extra good ammo cache and a switch. The switch just runs the platform you just rode up.
Past the platform, you can go up or down (Fork A). Up takes you to a minor jump‑down into a huge room with many enemies including Blue Hunters.
Down takes you to an EW hall. The first thing I did was rush up and down opening all the doors on the way back and knocking with my fist then retreating. That worked out pretty well for me.
The third door is a massive ammo cache. By the time I arrived, all the enemies which lurked in here had destroyed themselves or wandered off. There is a periodically moving platform that goes to the yellow charger and a jump down to small space with no escape. Is there any point to that area, or is it just a trap?
The first door down this hall leads to a series of three small circular rooms. The third splits off two ways, and Fighters are visible down each. As you are considering, secret doors in the 2d room have opened behind you, caused by you stepping into the third room, and Fighters ambush you from behind, which alerts the ones in front. Pretty good and funny trap!
Past that there are two Compilers and a Terminal. Mithrandir tells you that he can’t communicate long distance, but two ships of differing alien types have arrived from Antares Club Med.
The 2d door in the EW hall has a save point. Previously there were enemies.
The end of the hall was guarded by a Flick’ta previously.
There is a door that opens to a room (the Riddle Room) with two Flick’ta and lots
of rockets and a switch. The switch opens a cupboard containing another switch.
That switch doesn’t seem to do anything. There is a partially open door that is
unresponsive. Sewage flows in and out. How do I move that switch and get the
door open?
R&R, then head up for that huge open area. It’s knee deep in sewage, which renders grenades less effective. There is a semi‑concealed well that drops away in the centre of the map. The bottom of the well teleports you to something very high above this arena (Tower A).
There is a semi‑secret large door at the far south end. Hunters ambush you from behind it. The map is confusing. It seems that it leads off to the west, but you can’t move beyond the apparent 4 walls. There must be access from far above.
Tower A has a nice shot at a switch level with you in the wall. It opens a large wall, which unfortunately, auto‑closes. Shooting the switch a second time won’t stop it. Through that area, lots of Fighters appear, but at the end there is a teleporter to a grim Terminal. When I returned for my second try, before teleporting, I took the time to kill the Fighters. I saw that two batches of fighters had come out of secret doors. One of them stays open. The other opens intermittently, possibly by stepping on certain polygons. Behind it, there is a switch and a purple charger! The switch just opens the door.
This Terminal points out the cupboard behind you, in which there is an uplink chip. Mithrandir says the Enemy have brought in an even stronger Juggernaut, but he’s going to do something funky to my shields with the teleporter (actually an interim jump through an invincible cannister) so that I can fight it. In my second try, I noted that there is a doorway to the south of the terminal. It has a receptacle for your uplink chip, which I used. You must decide between the teleporter past that, or the one to the right of the Terminal. That’s the one that does the invincibility thing.
From Tower A, there is a more difficult switch to hit, also at eye level. It opens a large wall on the north. Some Fighters await. If you go in and go E then follow it all the way, it teleports you to Fork A. If you take the N way, then through the door you’ll face two Troopers then there is a Terminal (Fussy Terminal). Mithrandir says he won’t or can’t transport you until all the repairs are done and the extermination is complete. There appears to be a teleportation alcove to the left, but right now, it does nothing.
The purple is good, because when your invincibility runs out, run right up to the juggernaut and finish him with fusion pistols. You’re too close for him to hit. I experienced a glitch in which I could hear my shots hitting him, but I could not see him at all. It will nearly kill you when he dies and explodes, but not quite. Oh, don’t worry, during the fight, about checking out the NW alcove out of which the Juggernaut is released. It stays open.
Returning now to the purple charger and then the grim Terminal, the Terminal is now dead. I noticed that the cupboard impinges into the room I can’t reach (from the Riddle Room). I still couldn’t reach it. I took the south teleporter. It takes you to the Fussy Terminal.
In the Fussy Terminal, Mithrandir is now talking about a new type of alien I am supposed to have noticed. He says he’ll teleport me to a medical facility to examine it. Step into the alcove to the left which is the exit to “Free Falling”.
12. Free Falling
Pistol ammo will teleport into this first room.
To the south is a long hall. Fighters beam and drop in. At the end is a yellow charger.
To the NW is a long hall. Fighters and a Compiler drop by. At the end is a switch with opens access to a NE hall from the original room.
The NE is a long hall leading to a teleport alcove. What
is that elevator noise right there? Bring
your AR when you teleport. The first Purple is too close for hit & run.
Then an Enforcer wakes up. Then a Trooper is hurling grenades past a Purple.
It’s draining!
After your next teleport, grenades and are falling like rain and that’s the least of it! Be on the move. Get through a door. Dispatch the Fighters inside. Take peeks back out to see there are two ledges beside where you arrived, filled with Enforcers.
Go along the hall, killing Fighters. Grenade Jump the gap till the hall is clear. Take a peek out the door. It’s just another vantage on the Enforcer room.
Jump down. It will teleport you back to the original room. A tank was waiting for me. I don’t know where he came from.
After you charge, you may enjoy a nice review of the map. I decided to come into the Enforcer room sideways, firing grenades, then flee, and then try moving northward after I jump into the pit. Sadly, I fell in the lava, though I noticed an ammo cache down there.
This time, when I got safely behind the door, I just lined up my pistols on the Enforcers across from me, and flicked the door open and closed, taking what shots I could. Then I finished the Trooper and Hunter with the fusion pistol the same way. Then I followed the hall to the opposite end, and did the same with the other ledge. Easy Peezy.
I jumped to the bottom to go back to charge, then returned to the pit. This time, I moved a bit north as I fell, to land in some corridors not quite all the way to the bottom.
There’s a little ammo cache for your AR, and yes, it’s a nice choice. Lots of Flick’ta, and while some seem placid, the others are hostile and stir up the placid ones. Flick’ta don’t seem to in‑fight as much for me, and the hit and run doesn’t work as well either, so I just gun them down. There were quite a few little ammo caches, so I think I actually came out ahead.
There is finally a save point in the maze. The maze isn’t difficult, just look at your map if in doubt.
The far E has a circuit to break.
The far NE has a switch.
One of those opened a new area in the far W. And not far from there, in a previously explored EW hall, there is a purple cannister, probably exposed by the other. Don’t pick it up yet.
In the new area, there is a door, which opens to a dark open area below, with drones and Blues. Shoot them all but don’t go in.
It’s time to go get the ammo from the lava, and to get a fresh Enforcer gun. So go get charged and return to the entry point to the Enforcer room. Do a double backwards lossless rocket jump to one of the ledges. If there is an Enforcer gun, drain yours then pick it up. Take note where the walks are lowest to the lava. Jump into the lava, pick up the ammo and swim out onto the lower walks. Recharge and do the other side. I found no secret doors on either side, so skip the rockets once you have your Enforcer gun.
Save. Get the Purple Cannister. Cautiously go out that far west door, trying to stay on top of the wall. I couldn’t. A huge number of enemies teleport in. The switch opens up a door. The door leads down a hall to the exit Terminal. So, if you want to explore, don’t go through that door till the enemies are all dead, or they’ll trap you in there, and you’ll need to spend ammo and blood to remain. The terminal seems to be some rather poor song lyrics and it is the exit to “Med Lab”.
13. Med Lab
There’s a yellow charger right away, but when you leave the room it quits working.
Dispatch the Fighters. I killed the Flick’ta in the water, even though it cost ammo, in case I fell in. There was nothing good in the water. I needed to use ammo to help get out. Merely swimming up wasn’t enough. But backwards rising with AR firing did the job.
Follow the hall to the switch. Be sure to turn off the switch when the door is open (switch A).
I got excited and just started running around killing stuff. I wound up in the Recovery Ward. How apt! It should have been the psych ward. There is a save point, so once again it is apt. When you get hurt, you wake up in the Ward! It’s recognizable by the 4 blue ‘beds’.
Through a terminal there, Mithrandir said he accidentally brought me in via maintenance ducts. The Pirates (Pfhor) are experimenting on the Galaxans (S’pht). I am to save the Galaxans if possible, but above all, stop the Pirates from learning anything.
The terminal was not precise, but it depicts a Containment Station 6, which presumably contains the Galaxan, and shows a release switch inside it. It mentions a hydrospa east of the ward and up an elevator, through which you must something. And it mentions a teleporting terminal there which will take you to engineering.
There’s a shorter and easier way than I went. From Switch A, enter the room you just opened, take the west hall to a diamond shaped room, follow the north hall from there.
To the south of the pool where you originally entered this level, there are tunnels above. As you explore the level, you’ll find a maintenance terminal that calls those tunnels above the ‘Access Tunnel’. The terminal says that if the drains are clogged, the area will flood, and the door by Switch A will seal, so the Access Tunnel will be the only way there. So use Scuba gear.
From the diamond shaped room, take the west hall till you’re in a smaller diamond shaped room. You’ll have to ride an elevator to get there. From the smaller diamond shaped room, take the north hall around to a room containing a tank. Hit that switch. You’ll hear an elevator start. Where is that elevator?
To the far W, you’ll pass through a melon shaped room with ledges on the side, facing fairly heavy resistance. Just past that is a red charger. Don’t bother rocketing up to the ledges.
Now clear out the access tunnel, because just near the end, you’ll trigger some enemies to beam in. Just jump down to the pool and linger a little near that point to let the Troopers hurt themselves trying to shoot their grenades down. Go around again and clear out the survivors.
There is stuff on the map you can’t get to. It’s just stuff above that you saw through the window at the arrival point to the level. Besides the artistic merit, I think it is intended to create ‘noise’ in critical areas of the map.
Save and head east to the second pool (not counting the one seen through a window). Be careful of this pool. Lots of enemies beam in. After my first death, I backed in, and when I heard them appear, I raced out to a better tactical position. Also, once you identify which polygon triggers the beam‑in, you can jump down the stairs to avoid it till you choose to deal with it. I found nothing useful in the water. There’s a switch at the end. Hit it, to unlock the last door in the diamond shaped room.
Follow it around into a room. Quickly hide behind the elevator, to avoid the Trooper above. Ride it up and dispatch him. Hunters and a Blue will beam in below when you disembark from it. There’s 4 options. You can rush past the Trooper, fight from the elevator then deal with the beam‑in, jump back down when they beam in, or just slug it out on the ledge. Only the latter sucks.
Once they’re dead, you’ll be tempted to R&R. Proceed to the switch first, it’s safe.
A new door has appeared between the ward and the diamond shaped room. It’s the Containment Centre. Release the Galaxans. Make Peace with them. Good luck with that. When they’re all dead, you can use the terminal to exit to “Engineering”.
14. Engineering
Mithrandir says you’re here to exterminate and restore, starting with an uplink chip for offstation teleportation. Ground sensors and air generation need repair.
Kill the Purples. Use the Yellow Charger. Ride the elevator down.
Through the door are many fighters, Blues up on pedestals, Purples on the ground. So, pistol sniping from the elevator seems best.
In the room, there is a cupboard with an uplink chip, and also a receptacle. Use them.
Past that is a room with a Terminal urging haste with repair of life support. Past that are stairs with many Purples.
And then you arrive at a confusing hour glass room. There are many dead save points and a dead yellow charger. A chip receptacle seems to activate. Two turn‑switches are dead. A stop‑light switch is dead. But one turn‑switch works. It starts an unstoppable open and close cycle of a subtle door in the waist of the hourglass. In there is a bit of ammo and a terminal through which an alien AI speaks to you from another ship.
Since the one side of the waist opens, obviously you try the other. It opens too!
Down the stairs there are enemies and a room. It has a dead yellow charger, a dead air charger, a live save point, and a live stop‑light switch, which opens a door to more enemies. I should have tried the save point first. A terminal warns you that the Galaxan ship sent a transmission to a terminal on this level. Ooh, really? And it warns that there may be many Galaxans nearby.
Indeed, in the next room, which contains many columns, many Galaxans beam in, as well as some ammo. It’s not a good tactical position if you just have a sliver of health. I lured them into the save room, then ran in and out, grenade sniping. I had to flee around a corner, because their bolts are homing bolts. That meant I had to carefully managed the door, which wanted to close inconveniently on me.
After that, there is a door which looks down upon a wide stair case with many Pirates. An elevator is going up and down to the door, carrying a small ammo cache.
Don’t go down till you you clear out those within hearing. A few will manage to ride up.
Jump down. Then, ff you are as weak as I was, time how long the elevator takes, so you can rush up, awaken the sleeping enemy, come back and immediately ride up to semi‑safety.
Up the stairs, through the big room, through the door, down the hall, past the locked door on your right, to open the door at the far end. Lots of Fighters go for you, distracted by Flick’ta behind them.
Once clear, there is a switch. What does it do? I think it started an elevator in the water.
You can go past the screen to jump in the water. There is an elevator in the water. Another Flick’ta may ride down the elevator. You want to be frugal with your air but they won’t leave the deep water by the elevator door. Punch them out. Save. Return.
Wait in the shallow part for the second splash noise to announce the arrival of the elevator. Swim for the top, to preserve your air. Check the map for how to get on to the next level before the elevator goes back down.
You are in a narrow hall. Punch out the lights to move forward. You’ll see a Galaxan by a switch. The switch needs to be hit eventually, but I found the fluctuating water levels annoying after I hit it. I advise against jumping down, because there is no exit and the Galaxans are firing homing bolts and you don’t want to swim more than you must. Instead, snipe them with super‑charged fusion shots. If one of their bolts clears the floor of your hall, you must run back around the corner to escape, dropping you back into the water in most cases. Always conserve air by swimming.
Once clear, read the terminal. It says Mithrandir is finally happy, but he is sending you to work with a Galaxan AI to prevent the imminent explosion of their damaged reactor, which would wipe out everything within 500K Km. The terminal is the exit to “Jaunt”
Even though he is happy, your yellow chargers are still dead. Do you want to sacrifice the air to go and save?
You never do open that locked door in the hall, but you do see that it just leads to the exit room anyway.
15. Jaunt
This is the first level in the “Showdown” Chapter.
Right where you start, there is a cupboard with a switch. If you turn around, a door opens behind you.
But straight ahead you find a purple charger. It is fast enough to get you strong enough to defeat the Tank and Fighters that appear.
Behind you is an intersection of two corridors. Both lead to dead‑ends. One has a bunch of drones. At the other, the map shows you lots of Bobs are very near by. You note that you could do a rocket jump to join them.
The switch lifts a platform with a little ammo cache out of the small pool of lava.
From the purple charger room, there is a door way to some stairs. You follow it to a dead‑end that opens at your approach. You’ll see a Galaxan at a terminal (A).
After the dead end open, a secret room is revealed off the purple charger room. Attempting to enter that room causes an immediate crash! I tried with the May 22, 2007 version of DiaBD (SDL).app, and with the December 26, 2008 version of Aleph One but this Crash Room killed them all.
That secret room is detectable prior to opening by using your action key on just the right spot. You’ll hear a ‘locked door’ noise.
You can grenade hop down to Terminal A. The Galaxan seems cool until you touch him, then he attacks. The terminal says nothing. From it, you can follow a narrow hall around the exterior. There are drones in a room with a transparent wall viewing two moons. It has a marked square in the floor but did it have an effect? You’ll get a chance to see a Tank herding some Bobs. You’ll run by a window with a circuit you can break later and where you’ll later find a flame thrower. You’ll get a chance to safely shoot down some Purples guarding a save point. You’ll hear some noises at various points.
Finally, you’ll enter a large room with lots of Compilers and Troopers on walkways arising out of lava. I jumped in, and did find a clearly marked teleportation square, but it just took me on to one of the walkways in the same room.
After I died, I tried the lossless double backward rocket jump up to the Bobs. They weren’t there. They must be on another level. An exploding fake Bob came in though. There was a nice AR ammo cache. When I explored into the next room, two Compilers and a Purple attacked.
Past that, there is a teleporter alcove to the right and enemies fire down from above it. To the left, a Trooper comes down the stairs. I found that if I went back and forth from near the teleporter alcove, I could keep him on the stairs, where his grenades hit the railing, so he killed himself.
That turned out pretty good. From this Stair Room, I had to be careful, I wasn’t in an unassailable position. There are several exits and openings.
The guys above the teleportation alcove blow themselves up without much help if you linger and dodge near it.
Down the stairs, lots of enemies in‑fight, and Troopers hurt themselves hitting the door frame with grenades, if you keep crossing in front of it. At the SE of that room, a platform leads off a short distance and contains a fusion pistol. A door leads out into the series of large rooms.
The door in the middle of the stairs leads to a save point.
Up the stairs leads to the Bobs. They are all fake exploding Bobs. Where the Bobs had been was an opening to those walkways where I had died going the other way.
There is a tiny elevator that takes to you a ledge overlooking the crowd at the bottom of the stairs. This is just a place to get killed if you haven’t cleaned them out, so do this last.
That teleporter alcove takes you to a new weapon!
First you arrive at a ledge overlooking large rooms below. There are Troopers on the ledge and two more teleporters. Stir up some trouble below. Try to explode some Bobs against Tanks.
Take the S‑most teleporter on this ledge. You’ll be on a small ledge with a teleporter. Take it.
You’ll be on an EW ledge with some ammo near the extreme SE of the map.
Jump down into the second most S‑ward part of the map. Get the flame thrower! Break the circuit? below) so you can get back to the save point easily (go to the 3d, then 2d, then 1st, then up the stairs).
Leaving that room, you are in the Fourth Large Room (see
The series of large rooms:
The First Large Room has an opening to the stairs leading to the save point. You can see the Death Ledge to the east. There is a door to the Second Large Room.
The Second Large Room contains a huge ammo cache. You can see the ledge with two teleporters above it. It opens to the Third Large Room and a door to the First Large Room.
The Third Large Room has a big window through which you earlier saw the tank herding Bobs in this very room. This room contains a door to the other side of the Crash Room. You can enter ok! But just as you are passing the centre, it still crashes. Actually, I was relieved. You can probably still finish the map, but it removes the most convenient access between the purple charger and the save point. Now you must use a grenade each time. Also, you lose the ammo cache in the Crash Room. This room also opens to the Fourth Large Room.
The Fourth Large Room can see the
final ledge on the way to the flame thrower. Also, it has a door with direct
access to the Flame Thrower room.
From Terminal A, there is an open doorway and a closed doorway. Behind the closed one, there is a genuine Bob, but a Blue appears. There’s probably some use for the Bob, so leave this for later, and be sure to kill the Blue quickly.
The Walkway Room has doors at each end, which we have discussed, and a door in the middle leading down into lava. The obvious path which turns to the right, leads through a secret lava filled hall, but then right back out into the main lava. Grab that teleporter to get out. However, if you turn left at the bottom and swim back up, you’ll get on to a little platform from which you can see a narrow lava passage. Follow it then swim up. You’re on another little platform, facing a locked door. What opens this door?
Terminal A now works. The Galaxan AI says to retract two towers, then open 3 interlocks, re‑activate 3 sensor arrays, then re‑integrate them using a breaker switch. He says Galaxans are called Ygn’oml. The forward sensor array is in vacuum. You exit to “Sensori Overlord”
16. Sensori Overlord
Save immediately.
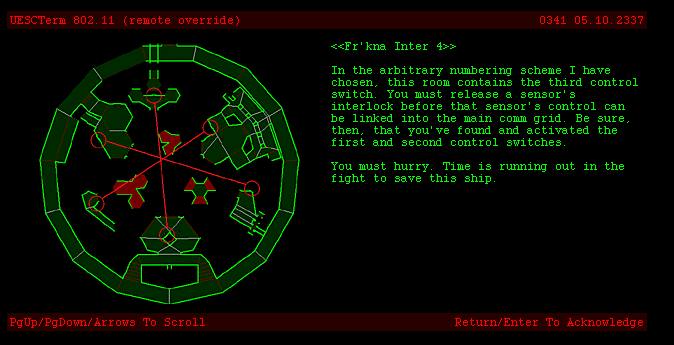
This map is a Walk‑Through killer In other words, it crushes those who attempt to describe a Walk‑Through. The levels are too overlaid for the maps to help and too complex and interconnected for descriptions. My solution is to give everything a name, then to give the entrances and exits for each name. Then you can build a path to where you want to go.
The constant need to return for air and to stop to punch out the perpetually re‑generating drones makes this a very slow level to complete. You can speed it up but only by draining your ammo severely.
As even greater torture, everything is color coded. As a 60’s kid, I learned to process the world in precise black and white. It’s an effort to use colors to remember and distinguish things.
As my mother would say, this is maybe not my very favourite level. We’re from Canada.
As a hint, this level is all about having multiple exits from elevators and drop‑shafts. Just because an elevator isn’t working, doesn’t make it irrelevant. Jump down it to another exit.
Start room
Charge your air (Air Charger A). Drones and Galaxans will float up and harass you as you try to read the chatty and complex terminal.
The Galaxan AI:
repeats the goals, though it refers to the interlocks as ‘enablers’ and the re‑activation as ‘control switches’ and the breaker switch as the ‘main control switch’.
advises you to get the main lift running first, then find the main life support centre, which has a health charger (red) and an air charger (B) and a save point. The Main life support centre also contains the final switch, useless till you do all the others.
says that when you leave here, it is hard but not impossible to return.
says that rrom here, to get to main central lift, jump down (Original Dropshaft), head south then west out of the next drop tube till you get to a dark red elevator platform in grey walls with turquoise ceiling. From that elevator, go NE to main central lift. From there, a 150∞ turn will drop you into the lift activation room. The top of the lift has the first enabler. If you drop to the bottom, you’ll have to work your way back up.
Later, when you shoot a switch at the top of a tower, a teleportation alcove opens up. It takes you to Green & Turquoise Tank Battle, where you’ll be under heavy fire.
For your assistance, here is a screenshot of the terminal, an early map, and a graphic from the DIABD Faq I mentioned. The latter does NOT use the same names and numbers as I am using.
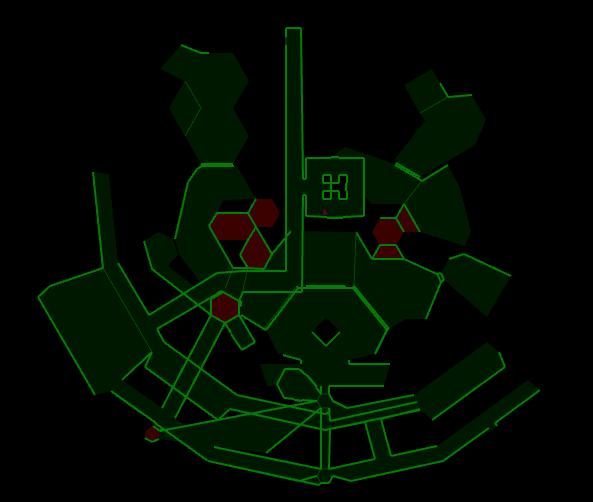

The Galaxan actually gave good advice, though it didn’t work out for me. I dropped to the very bottom, then took every right turn, except one into an inactive medium sized elevator (A). That brought me to the Main Life Support Centre. Gradually, all the enemies I stirred up followed me there for dispatching.
Main Life Support Centre ‑ found at the very bottom of the level. It is off a reddish hall that cuts in from the perimeter.
has a health charger (red) and an air charger (B) and a save point.
also contains the final switch, useless till you do all the others.
North from there, Dropshaft (12:00) is currently blocked. A switch beside it does what? See elevator F for instructions to lower this platform.
Lower Perimeter ‑ From the Main Life Support Centre, go as far as you can towards the perimeter. It makes a complete circuit, which leads you past:
At about 1:00, you hear a door working and you find a small, active elevator (F).
At about 3:00, there is a tiny active elevator (C).
At about 8:00, inwards, there is a Reddish hall, which leads by Elevator A and to the Main Life Support Centre
At about 8:00, outwards, there is a ledge. If only your rockets or grenades were working!
At about 5:30, there is a hallway spoke leading out to the actual perimeter. From there, eastward leads to a tiny inactive elevator (D) and westward leads past a very tiny, very tall, active elevator (E) (at about 4:00) to a dead‑end.
At about 10:00 you pass another medium sized inactive elevator (B).
At about 12:00 is the platform that was originally a dead‑end, and later access to the Reddish Hall (Dropshaft 12:00).
Reddish Hall
On the lowest level, runs from of the Lower Perimeter to about 11:00 of the Lower Perimeter, past the Main Life Support Centre and Elevator A
The elevators:
A (near Main Life Support Centre on bottom floor) - inactive through most of the play on this level)
Impenetrable narrow tall Windows looking towards Centre
Top -
Upper Middle ‑ To the SSW, Blue Floor With Red Diamonds & Red Halls
Middle ‑ To the SSE, small room with Switch to activate Elevator A
Bottom ‑ To the NNW, Lower Perimeter
B (10:00) ‑ initially inactive. Connects with:
Top 2:00 - Dropshaft 12:00
Bottom ‑ 10:00 ‑ Lower Perimeter
Middle ‑ Small Northern Switch Room
C (3:00) ‑ has one exit to original perimeter, one to Turquoise halls, and one higher up to a ledge. From the ledge, you can make a jump to another ledge at the same level, and you can see a Galaxan in there. Jump over there. Notice the yellow charger! Fight the Galaxan and the other one that joins him. I was so low on fusion batteries from knocking down drones by this point that I was determined to use my fists. When you fall off this ledge, note the air charger (C).
D (12:30 from the centre). Connects to:
8:00 - Small Northern Switch Room
10:00 ‑ Dropshaft 12:00
E (outer perimeter on lower deck, about 4:00) ‑ has several exits.
turquoise narrow hall, leads to a circular track almost directly above the first perimeter we followed. This hall has access to Elevator C and to the drop‑shaft at 6:00.
The top exit is blue. There is a
switch there that opens narrow bars into a room with windows. Drones and a
Hunter guard it. It’s not getting into the room, it is dropping down through
where the door was into the level below to the “Red Floor Area”. That has a switch.
F(1:00) ‑ It exits on:
Top, N - Grey Tunnels. See below.
Upper Middle, E - a ledge the same height as the yellow charger. You can jump from there to another ledge (Red Floor White Wall Ledges) which contains a switch. It must be enabled still. You can run around on this ledge, and jump across to another, like it.
Middle, SW - “Under The Yellow Charger”
Lower Middle, W ‑ short hall between Elevator F and Dropshaft 12:00. Contains switch to lower Dropshaft 12:00. It won’t come back up.
Bottom, NE - the original perimeter
G (outer perimeter in second lowest level, about 8:00) ‑ This is the one that’s hard to find! It is accessible from the Blue Floor With Red Diamonds & Grey Walls Ledge. It exits to:
Top ‑ Blue Floor With Red Diamonds & Yellow Walls Triangle expanding eastward
Bottom - Blue Floor With Red Diamonds & Grey Walls Ledge
Middle - Blue Floor With Red Diamonds & Red Walls Halls
Small Northern Switch RoomConnects to:
N - Enabler Switch for Control
Switch #1.
S ‑ window through which you can watch Platform Rise after switch hit
East ‑ Elevator B
West ‑ Elevator D
Red Floor Area ‑
Contains the enabler for the switch at Air Charger D.
To get here, take Elevator E to the top blue area, then drop through where the barrier used to be before you hit the switch there
Under the Yellow Charger.
I already mentioned the air charger. There is a room which expands towards the centre of the map. The ledge with the yellow charger is overhead. There is a terminal (B). It says you have failed to activate the enabler, so go to the southernmost ring on this level, enter a chute that faces south. It offers two unhelpful graphics.
There is access to Elevator F.
There is access to a wide outward perimeter hall. ‑ See below.
Grey Tunnels
To the left, you can go to a jump down and towards the west. Try to land on a reddish‑brown floor. That will put you on the ledge with Air Charger D and a switch, unfortunately also not yet enabled.
To the right, it does to an intersection. From that intersection, you can go:
to the right, which brings you to a very high jump, facing SE. Actually, this is the dead‑end when you were in the outer perimeter at the very bottom.
Or, you can go to the left, which takes you to the far north, then directly towards the centre. You can jump back and forth to ledges around elevator shafts. I’m pretty sure this is the way to the exit. Even before that,
Outward Perimeter hall. This isn’t quite the outermost perimeter hall.
At 12:00, due north, there is a door that opens after the final switch is shown. It contains a Hunter, and the exit to “Galactica II”
At about 2:00, there is the Terminal Room Under the Yellow Charger.
At about 10:00, there is another Terminal Room. It gives a much better map of the switch relationships [insert desktop picture] and it informs you that once it is all done, there is a room at the far N which will transport you out. Above you is a switch and an air charger (D). There is a window towards the centre, showing a bluish multi‑level below with a large inactive elevator, and a tall central tower.
At 7:00 there are stairs going up, that join with the 5:00 stairs. There is a large room with lots of windows looking toward the centre. There is a terminal. It says that Control Switch #1 is right here, but the enabler is due north. It gives the location of the Main Life Support Centre and the Yellow Charger, and various other clues. Right between the stairs is access to the original hole through which we dropped.
At 5:00 there are stairs going up, that join with the 7:00 stairs.
Turquoise Halls
These Halls are critical for their access to Drop Shaft (6:00)
To get here:
Elevator E
Elevator C
Original Dropshaft
Dropshafts:
Original Dropshaft ‑ Opens to:
Top - Yellow floor (?) Triangle
Upper Middle - The start point, from which it is the only exit
Middle - From Control Switch #1, there is a narrow access between the stairs.
Bottom - The bottom level, at about 6:00
Dropshaft (6:00) ‑ It is in the very outer perimeter at about 6:00. Opens to:
Top - The Turquoise Halls have access to it.
Bottom ‑ Blue Floor with Red Diamonds & Grey Walls Ledge
Dropshaft (12:00) ‑ near the Main Life Support Centre, it is initially blocked, but a switch accessible through Elevator F will open it. See Elevator F for instructions. Connects to:
Bottom 6:00 - Reddish Hall
Middle 8:00 ‑ Elevator B
Top 12:00 ‑ Grey Halls
Blue Floor With Red Diamonds & Grey Walls Ledge ‑ Possibly you can jump down to it from the Grey Tunnels? Certainly you can use Dropshaft (6:00) heading WNW to get to it. Exits to:
Elevator G!
A Ledge overlooking the bottom level right at the entrance of the hall leading to the Main Life Support Centre
Blue Floor With Red Diamonds & Red Halls
Elevator G
To the east, Dropshaft (6:00)
To the west, a jump down to Red Floor White Walls
To the NNW, Elevator A. This is
the way to activate Elevator A.
Blue Floor With Red Diamonds & Yellow Halls Triangle
Elevator G
Original Drop Shaft (this is the way to return to original room!)
Blue Floor With Red Diamonds & Grey Walls Alcove ‑ accessible from Elevator A
Contains Trooper, and an Enabler Switch and a window. Through the window, you can see the various platforms that the Enabler Switch moves. And you can see a switch on a tower, which you can shoot with a supercharged fusion shot. It opens a teleporter alcove in the Start Room. Beware. When you get to the bottom of the elevator, Troopers and Drones will be waiting.
Red Floor White Wall Ledges
This is two ledges. You can jump down to one from , and to the other after making a short jump after taking Elevator F.
There is a switch and an air charger.
You can jump down into a room with a Terminal.
Green & Turquoise Tank Battle ‑ accessible through the teleportation alcove in the Start Room after you shoot the switch at the top of the tower. Actually, the tanks are your friends, as long as you stay on the opposite side of the counters from them, because their grenades will be blocked and they’ll turn on their buddies. Before the battle ends, go beyond the first set of counters, because that will trigger the appearance of more Tanks. Once the battle is over, advance to collect your reward of a large fusion and shotgun ammo cache, and the honour of reading the secret Bingo Terminal.
Were you as amused as I was when the exit terminal said it had all been a big waste of time? Yes, it still can’t contact its people in the reactor section, so its just sending you in blind. Argh.
17. Galactica II
No more vacuum! It’s pure bliss!
You start in a wide stepped room with ammo scattered thinly but broadly and some enemies, easily avoided. To the east and west are similar rooms. A Terminal (read it later) gives you more excuses why this space‑faring race can’t keep their doors working. It must have a sense of humour, because it says to just go west from the diamond shaped room to get to a save point, but of course that door is locked.
The East of the similar rooms has an Enforcer, the West has a couple of Fighters. They each contain a locked alien door, and an unlocked regular door. Behind the regular doors, several Blues await, and a switch which opens the alien door for that room.
The alien doors both enter N‑ward into medium sized rooms, and past those, into the same large hour‑glass shaped area, with a red charger and a door at the waist. Mind the plentiful enemies.
The door opens to a small diamond shaped room with two Blues inside. At the long tips are locked doors or fake doors. You came in at one wide tip and the other wide tip is an unlocked door.
The unlocked door leads to a breakable circuit. Once broken, lots of Hunters and some Fighters attack. I ran back, and they refused to follow me into the Red Charger area. Great, so charge up.
Continuing to advance, go to the right. Blues attack. Hit the switch. The save point should now be open (west of the diamond shaped room), but watch out for the invisible Galaxan.
Now go to the left of where you broke the circuit. Blues and Hunters attack. Look out the window to see many drones heading indoors, gathering off to the east of the diamond shaped room.
There is a switch there. Looking through the window, you can see it open a little window in the structure. Through it, you can see a Blue Hunter.
On your way back to save, look to the left and see a large hall, apparently blocked by a platform.
Moving south from the save point, you find a door which reveals stairs descending to an invisible Galaxan and a switch. You see a ragged hole into space where the ship was damaged.
Save. You can now move east of the diamond shaped room. Wake up and punch out a gang of Blues. Follow it around and open the green door, then punch out that gang of Blues. Follow it down to a huge hall. Many Blues and Drones attack, but the 6 Blue Hunters up on ledges are impassive.
Hit the switch. Give up on clearing the drones, which seem to be generating endlessly. Save, then head back to that wide blocked hall. On the way, check out the two little alcoves on the map. They are each on the corner of the wall that heads S‑Ward from nearest the broken circuit. I couldn’t get into them.
Blues await you inside. Once clear, the W‑Wall opens to reveal a window. The N wall is locked, the S door is unlocked. Go S.
Going through the door pops open the locked N‑Wall behind you, quietly, letting gang of Blues ambush you from the rear, just as you are awakening a large group of Blues and Hunters in the new room. Pretty funny!
If you go through the N‑Wall though, you find nothing but a switch that will let you back out. Aww.
There is an invincibility cannister bouncing up and down in some sort of machine. A switch nearby lets you start and stop the machine. Get it just perfect, so you can grenade‑hop in but just run out. Don’t do it yet.
Save. There is also a teleportation alcove. Use it.
It seems you are teleporting endlessly. If you rotate a bit, it will interrupt the teleporting long enough to hit your map key. Then you can see that you are in a little area being teleported in four steps from the west to the east then back again. There is a little alcove to the north in the middle. Take it. It teleports you into the machine right beside the invincibility.
Check your map. Looking back the way you came, you see you crossed over a large platform, and that there is now a new area opened up beside it. You can jump down inside. You’ll be teleported to a long hall full of blues. At the end, there is a yellow charger and an invisible Galaxan.
When you step into space, you’ll be teleported to “Tower Of Babel”
18. Tower of Babel
You won’t have much invincibility left.
There are four medium sized squares, connected by rising platforms. You can’t get all the way without getting squished a bit.
The NW square has a terminal. It seems the Pirates have
rearranged the switches, but can’t cloak them, so to get them in the correct
order, just always hit the active one. It says to get to the top of the deck
and not get between the platforms.
The SW square has a drop down. It spirals around. There is no room to dodge, so I hope you saved some ammo for the Fighters inside. Eventually it comes to a drop off.
Down the drop off, there is lava, with several platforms, and many drones. Use your fusion pistol on the drones. Jump from one to the next till the end, then drop off, hit the switch. The platforms turn into stairs! Cool!
Down the stairs. Each flight of stairs has one square through which you can drop into lava. Tempting.
At the bottom, there is a blue walkway around the square stair structure. It has a door to a drop off. Actually, I forget if there was something in between.
The drop off puts you beside a yellow charger, but you’re under attack so get through the door and flee down the stairs. Both left and right go down to join at the bottom where you’ll find a save point and a door.
The door opens to a large circular platform that quickly rises.
In this room you must hit switches in order. Your path is complicated with stairs and columns. Many Galaxans are shooting at you. There is no point fighting them, except to clear your path, because as soon as one dies, another appears. The switches are:
1. On a wide stage, visible from centre, to the west;
2. Visible from the centre, low, on the side of some stairs in the SE;
3. Behind a column, can only be seen looking inwards, far NE.
4. Behind a column, can only be seen looking inwards, far NW.
5. On a wide stage, visible from centre, to the west.
6. Low, on the side of some stairs, in the SW. This one opens a door at the far N. Go through it.
The door will close and lock behind you. Read the terminal. The Galaxan AI says that one of ‘your’ warships has arrived, but been ambushed and boarded by Pirates. Both ships landed or crashed by the base. It is sending you to ‘your’ ship. You exit to “Aye Matey”
19. Aye Matey
This starts the “Retribution” Chapter.
You start in a room reminiscent of the Star Trek Bridge. Indeed, it is the Bridge of the human ship. There are two silver doors, two switches, several windows (through which you can see a juggernaut), a Captain’s chair, and a dead Yellow Charger.
Through the silver SW door, you find an AR and some ammo, a chair and a table, and a dead Terminal and a switch. Hit the switch, which powers up the Terminal and the Yellow Charger.
Rush back out and guard the other door. It overlooks an elevator and tanks keep riding up and down, sometimes entering. As soon as possible, get charged and saved.
When the Tanks are cleared, read the Terminal, which contains the sad and heroic final log entry of the Captain preparing to lay down his life fighting the Pirates in certain defeat. He just wishes somebody would come along and give retribution. He describes this as his ‘Ready Room’. Ah, it was ‘Next Generation’. Well, no loss then.
The Terminal says this was the Santa Fe. Its weapons and Impulse Drive are intact but inoperative, its Main Drive is badly damaged, its transporter operative but inaccessible, external Communications are destroyed, internal Communications are operative. The planet has 1.56 gravity with a 42∞ C. temperature. The enemy ship, DIABLO, is across a river of lava.
The terminal says Mission Objectives are to Survive, above all, disable the enemy ship, kill all enemies on board, free hostages. Say, who is dishing out Mission Objectives if the Captain died before you arrived?
It shows a picture of the bridge. A label circles the E switch and then points to a boarding platform to the N. Another label circles and connects the two chairs. Hmm. The Access Elevator is ESE.
Ah, it closes off with a garbled transmission, but it looks like the Captain is alive and in a secret location.
The date is 0556 05.10.2337. How does that compare to the
Marathon story?
A diagram follows showing how to get on to the Diablo from the boarding platform. Something about a lower level Emergency Escape Access.
The WNW switch turns off the lights. Despite the general rule to hit every switch, I turned them back on.
I played this years ago, and there is something about the Captain’s chair. I tried rushing from one chair to the other. Nothing.
Indeed, the W switch raises and lowers bridge (Lava Bridge) across lava below, visible through the windows, extending from below our position to a structure with a door and windows revealing Pirates.
The Access Elevator has three exits. The Captain’s Bridge, a little alcove to the ESE, and the bottom.
The alcove looks like it has a teleporter pad, but it doesn’t do anything. Maybe later?
The bottom of the elevator has a door to the SW. It leads to a hall that arcs around the shape of the bridge (Arc Hall).
Arc Hall has a Spoke SE. It leads to a jump down to the W dead‑end of Transporter Corridor where two Enforcers await.
Arc Hall has a Spoke S. It leads to a window, where you can see a large circular area with a large central circular elevator (the Radar Dish). You see a switch above. You see two Purples appear. They head off. You see fusion ammo by the switch. Shoot the switch from here. What does it do?
The end of Arc Hall has a window to view the lava and Lava Bridge. The Juggernaut can hit you through this.
Arc Hall opens NE to a circular room under the Captain’s Bridge. There’s a bit of pistol ammo.
Take spoke SW from Arc Hall. You can see through windows to where the Purples are lurking. But it only goes to a jump off.
Jump down. You’re at the W dead‑end of the Transporter Corridor. Read the Terminal. It seems to say that slightly east, the Transporter Room is locked down. It has some info about the Access Bridge. At the SE, there is an emergency transporter. The Boarding Platform extends N. There is a small vaguely depicted area, then further N we see the Diablo Bridge, a large EW room. The Diablo Bridge has Switche 27F to the NW, a Save Point to the SW, a Terminal to the NE, Switch 14G to the SE. It says there are prisoners there. It says “Inboard Teleporter” will return you to the Captain’s chair.
Actually, the transporter room slightly east is the Inboard Teleporter, and it does return you to the Captain’s chair.
Transporter Corridor has a spoke SE with the Radar Dish Activation Switch.
I knew it. The Ready Room table has a tiny switch. Hit it, then go stand it front of the Captain’s Chair, looking at it. After a while, you hear an elevator, then the seat goes down. Jump down. After a while, it will return then power off.
Corridors Below Captain’s Chair
N ‑ switch to reactivate the Captain’s Chair elevator. There is a long delay before it takes effect, so you have plenty of time to get on the elevator.
ESE ‑ door to huge ammo cache, including Rocket Launcher and rockets. You must step on the right polygon to trigger their arrival.
WSW ‑ elevator to Radar Dish. Mind the two Purples. Then, from the elevator:
SW ‑ follow this to the Dish itself. As you approach, some Purples and Bobs appear. I regret to say that I let mine die because I wasn’t willing to get on the Dish till I checked it out. There is a Terminal below. It says the dish is the sole access to the Ship’s Observatory, where some emergency ammo can be found. So, ride it up.
NE ‑ follow this to a small room where you find a fusion pistol and some ammo, and egress from the Santa Fe.
When you leave the Santa Fe:
a juggernaut’s back is to you. There is a short path behind the juggernaut to the ESE in which you might try to hide. That’s a bad idea.
Above that little path is a ledge.
Across the bridge, there is a slow moving down, and many enemies. With patience, you could probably bull through, but there must be a better way.
Above you, to the right of the juggernaut, you can see an invincibility cannister
The emergency teleporter is a small, slightly raised platform on the Lava Bridge, right where the Terminal said. It takes you to the elevator beneath the Captain’s Chair.
In the lava to the right of the bridge you can swim down to a secret entrance. Swim along and up, and you’ll join a bunch of Bobs in brown. Through a window, you see Bobs in green. One says “Frog Blast The Vent Core” which is the rallying cry of fake Bobs. Kill the fake Bobs.
Shooting the switch through the window doesn’t seem to do anything.
Climb the rocky stairs. You are now on the ledges that contain the Invincibility. It’s a very tricky jump. From the ledge over the Little Path, you can jump out, then shoot a rocket to push you back onto the cannister’s ledge. A grenade jump from the other side does not work.
Farther past the Emergency Transporter is some shallow lava. The lava goes where?
I got the invincibility and tried. I got to the end of the lava channel, where it narrowed to a point, and I saw lots of Lava Flick’ta. The map showed dry land on both sides, but there seemed to be a roof or something. I must try again.
So, it turns out that bulling through is the best. The door into the Diablo is body operated. You must go right up to it and bump into it. The action key doesn’t work. Do it in 2 parts. First, go to the door, then lure all the Blues after you to their death. Then go to the door and dart through and hide behind a wall.
The next door is also body‑operated. Many Purples await. Call this the Entry Point.
Once through, there is another body‑operated door, to your left, which reveals a big elevator. At the bottom, there is a switch that controls the elevator. Past the switch is a U‑shape, with a final jump over lava (there is nothing good in the lava) on to a rising platform where you find a breakable circuit. It raises a second bridge across the lava, though to no apparent purpose.
From the Entry point, do a circuit of the big triangle to the N. You’ll note that the NE and NW doors don’t open, but a secret panel opens to reveal two Troopers. If you run along the newly revealed N wall, a little secret panel will open up that leads down some stairs to two Enforcers and a Hunter. Let that wait.
From the Entry Point, E goes to another BO Door. An AR and ammo appear, and two Purples. There is a switch which starts a large triangular platform N of the entry point rising and falling. There is a view through windows to reveal:
many trapped Bobs in a room with another switch;
a flame thrower on a ledge
a teleportation alcove
lots of flame thrower ammo
Ride up the triangle. There is one alcove at the top. It contains a BO door to reveal 2 Troopers and what is probably the Diablo Bridge. Mind the Juggernaut, it can shoot in. There is a yellow cannister, a save point, a terminal and 2 switches. The W switch doesn’t seem to move. The E switch moves, but what does it do?
The Terminal in the Diablo Bridge has a new logo. It must be the Pirate AI. It asks twice for an access code, then says ‘intruder detected!’
Return to the Enforcers. Shoot one a bit, then lure him away. Kill him with the AR then take his gun. Use that on the Hunter that will probably follow. Use the same technique on the 2d Enforcer.
Use the Enforcer gun on the Trooper, but don’t go in there till you read this. Going in opens up a secret panel to release many Tanks. You can escape past them up the stairs (where you killed the Exploding Bobs), but they will use the time to kill all the Bobs. Once the Bobs are killed, you can use a switch where the Bobs were to crush the tanks. It will take several attempts, there are so many. There is a little alcove to the left, before you release the tanks, but it does nothing. Also, if you pause before entering the stairs, you’ll be crushed.
On my second try, I used rockets to supplement the crushing and I saved one Bob. Yay? On my third try, I saved just about all of them, by not shooting till I got the crusher working. I discovered that it is the stupid Bobs that wake up the Tanks by shooting pistols. Duh.
Turn off the crusher while it is raised enough to check under it.
The teleporter takes you to the Diablo Bridge. Returning to the Enforcer area, you find your way back to the Flame Thrower area blocked. However, there is a new short hall leading to a switch and a teleporter. Use the switch. Use the Teleporter. It takes you back to the Flame Thrower Area. Now an elevator is going up to the Flame Thrower.
From the Flame Thrower, you follow a little hall to a BO Door, which opens to reveal a lot of Troopers have appeared, cutting off your retreat to the Santa Fe. I saw a Galaxan fighting with the Juggernaut. I noted that this secret door is almost immediately in front of that lava bridge that was the second one to appear. I had thought it was no use. It was a clue to this door, perhaps.
However, now that you have been seen, the second use of the bridge it to let all those troopers chase you. They’re liable to exterminate your Bobs, so you would have to stand them off.
So instead of teleporting back to the Flamethrower Area right away, linger in the Diablo Bridge, letting the Galaxans fight Pirates, then using pistols and rockets to take out the remaining Troopers.
Don’t forget to get the fusion ammo from the stairs where the exploding Bobs had been.
But there have been some changes:
The Little Path now extends S‑Ward. Some Bobs are inside.
Troopers now infest the Santa Fe. In fact, they are packed like sardines in the Ready Room, because a secret wall has opened in there. I should have used the door on them, but they surprised me, so I used rockets and flames.
There is a new alcove visible on the map, above, behind, and to the left of the Emergency Transporter on the Boarding Platform.
Back where the Little Path extends, there is a big obvious area to the left that goes nowhere. But the Bobs are huddling up against a grey wall. To the left, they are blocking access to something, either a teleporter or a jump down, possibly to the Transporter Corridor. To the right, you soon recognize the Access Elevator, from way back at the beginning. There are a LOT of Troopers down in the Transporter Corridor so eventually you must jump down there and clean them out.
Once killed, the Transporter Corridor opens up to a new large room with the Exit Terminal. It says you’re great, the mission was a total success, the Santa Fe is limping back to Midway on Impulse Drive, but you’re being transported to the Engineering Section of the Diablo to find the location of their home base.
I had to try the Invincibility one more time. Got it. Jumped into the right side lava again. This time, I found an exit to the dry land. Once I was nearly out, I panicked and used a rocket jump where probably just climbing would have sufficed. A lot of lava throwing Flick’ta attacked. I wasted a couple of rockets on them. I climbed to a yellow cannister then climbed to that ‘new alcove’ I had seen on the map. That was the escape, since the invincibility had worn off. I jumped down from that and landed right on the Emergency Transporter. I might have missed something, but I was sufficiently pleased with myself.
Take the Exit Terminal to “Bats In The Belfry”.
20. Bats In The Belfry
Another vacuum level. You know, you can turn any activity from play to work, just by adding a deadline.
At any rate, you start in a large room with two doors at one end. The map shows you a shape like a boat. The room has high balconies to the N & S, and doors at NE & SE.
The SE door takes you up stairs. Across a hall you see a save point and terminal. Use the save point fast then retreat back down the stairs. Many enemies will follow, but once your cross the lower door’s threshold, these return upstairs. In short, they refuse to fight on your ground, and you’re under a time limit to take them down. Still pistols and repetitive crossing of that threshold will do the job.
Go back upstairs and head through the west door. Charge your air.
Read the Terminal. Mithrandir says you’re great. It says you must do 3 switches in order at the top of the tower seen through the window. It gives other clues.
On the way to the east door is a small room from which enemies came. Nothing is there now.
To get the east door (E1) open, you must go inside the west room. Once inside E1, turn off the door cycle with the switch.
There is locked door east of the switch. Call it E2.
As you descend the stairs, a door pops open. Now it gets complicated. Don’t go in the door yet. Instead, lure them out. There is a door past that to the N Balcony, which may harbour a few. Lure them out. Eventually, go through.
The room contains a large square structure in the centre. Once in, the door locks behind you.
On the S, there is a red charger.
On the E side of the central structure, a secret door will open to reveal fusion ammo and, if they haven’t come out yet, Troopers. On the map, the N side is an elevator, but it doesn’t move at this time.
Opposite the red charger is a secret door down the S Balcony. It contains a switch that opens the dead‑end of the N Balcony. Troopers and Hunters will come for you.
At the SE corner, a door opens to a small room. If you enter, ammo will appear, but also enemies, and the enemies in the structure will come out.
At the SW corner, it’s the same as the SE, except that there is a secret passage. Through it, you must wind through annoying obstacles, picking up ammo. An invisible Galaxan attacks but a new kind of drone kills the Galaxan. Once the battle is over, continue through E2 back to the Save Point. Now the switch controlling E1 is invisible, but it is still there and still operative. However, after this, the path you took from the SW corner will be submerged in lava and the E1 switch won’t work.
Not to worry, now you can travel N from E2. First you’ll enter a small room to the E of a big circular area. Hit the Switch. It opens one side of the tall central tower. Old drones come out.
Continue NW to an EW room with a Yellow Charger and an Air Charger. Through its window, you can see the new drones kicking ass against the old drones. As you leave, it seems like one of the new drones is shooting at you. No, there is a room even farther N, in which 2 old drones linger. Shoot them through the waist‑high narrow opening, and then the new drone will turn his attention to something else. In that N‑Most room, note the fusion ammo. How to get in?
Now go save, then finish clearing the Room with the Large Square Structure and opening up the N‑Balcony. Return through the secret passage, but this time, use the N rechargers.
Now follow the N‑Balcony all the way. There is a save point, a switch, and some fusion ammo. What does the switch do?
You’ll notice a branch in the lava. If you swim down to it, then swim up, you’ll encounter two Purples. I suggest having both shotguns up. From there, you can jump down to the S into a hall. Purples will beam in on both sides of you. Shotgun the one behind you and punch out the others. Ahead, you’ll see many blues across lava, through a gun slit. There is a switch beside them. Super‑charge fusion shoot the switch, which will open the slit into a clear passage. Mind your lack of air! If you fall in the lava, head for the stairs and you can climb out. Eventually, a small bridge will rise up through the lava. Rush along the bridge, up the little stairs, past the Air Charger, then turn and clear the pursuing drones and take a taste of O2.
Searching for a save point, I went east up the stairs. West would have been better. Going E, the first left takes you to that original red charger. The formerly locked door is now open.
Continuing past that turn, I came to a room heavily defended by Drones and Purples, and in the centre, a Tank was rising. I fled out the upper exit, which soon took me by the room where I first saw the new kind of Drone. I rushed by, to let it take care of the enemies. I swam the lava to return to the Yellow Charger and Air Charger. Save and return.
By the way, on the map, it looks like the lava has more tunnels to the E. It doesn’t.
If you return to the room with the bridge, you’ll get a few rockets for your trouble.
If you now exit stage west, you’ll confront a single Purple and wind up on the S balcony.
Somehow I got E1 open again, so it isn’t impossible. Or maybe it was the Blue on the other side that opened it for me.
On the way from E2 to the yellow charger, search for secret doors to the west of the corridor. You’ll find one. Boo! Shame on the authors! That’s twice in this level that you cannot progress until you find a secret door. Secret doors are for bonuses! To be fair, after re‑reading the first terminal, I figured there must be some path around there. Also, the door is lighter than the rest of the wall, for no good reason.
Before passing through, make sure the big door on the Tower is still open. You might have to work the switch off and on. Beware, if you do that, you’ll release a lot of enemy drones.
Anyway, go through the secret door, follow it, you’ll finally be on the inside of the Tower Room.
If you fall, finish going all the way down. Jump down to the inner circle, where there is lava at the base of the Tower. The right hand switch raises you up a little, to get you out of the lava. The left hand switch teleports you to the yellow charger.
Open the secret door to your left and follow it along to the end. Wait for the slow elevator to finally start and ride it up. You can see a switch through a window below, but you can’t shoot through the glass. Actually, that is the switch back at the save point accessed through the N Balcony, so forget about that.
You can see a switch at the base of some stairs. You can jump down to the red walkway, take it around, hit the switch, then go up the stairs. Fight the Blue and Trooper. OR, you can just open the door and fight them, then go down the stairs, hit the switch.
It is from this point that you leap into the centre of the elevator, through the open part. You’ll need a lot of air, nearly a full tank, so you may want to recharge &/or save. I suppose the easiest is just to jump to the bottom to teleport to the Yellow Charger. However, there is another secret door! It’s the S wall where the Blue and Trooper were. Follow it to the N balcony. Hurry back to get a puff of air. Save.
When you leap into the centre of the elevator, have your fusion pistol ready because drones generate. However, if you leap directly into the centre and promptly hit the switch, that is your best defense.
At the top, get off the elevator and look back. There are three switches. Either I was very lucky, or your intel was wrong that the correct order is critical. I just went left to right.
Read the terminal and teleport to “Ambush!”
21. Ambush!
Start Room ‑ contains:
A save point.
A Terminal. An unusual splash screen shows only briefly, then a close up of an angry and anthropomorphic Pirate appears, threatening you.
A window to the east. Across space, you see a structure. A window shows it is teeming with Pirates.
A door opens to a room slightly below you, teeming with Purples and Hunters (P&H Room)
P&H Room. The Hunters are up on a ledge, but happily, they jump down so they can injure their allies. None of the enemies seem to be able to operate the door, but if you leave it open, Purples will come in. So, use the door. However, sometimes it won’t close if Purples are blocking it. This feels like a level near the end, so maybe fire a grenade or even rocket every time you use the door. You’ve been saving it for something, right? There is quite a bit of ammo. It opens to NS Hall.
NS Hall ‑ There is an alien door in the middle that doesn’t open. The N door goes into N Intersection Room
N Intersection Room ‑ Make a noise to wake the hunters. There is one at the end of each stairway:
East ‑ Locked door ‑ To EW Window Hall.
Downward stairs ‑ Hunter, red charger, switch and rocket jump to secret ledge (opened by upstairs switch). Opens the E‑Ward locked door. Be sure to listen, and once the door is open, turn off the switch.
Upward stairs ‑ Hunter and switch.
This switch is subtle. I ran around quite a bit to figure this out. You hear a
door open, then close. On the map, you see a new corridor, right in your area.
The map is confusing, but it seems to connect with the end of the downward
stairs. But, when you go there, you see nothing. Finally, you turn off the
switch before the door closes, then you go look, at the bottom, but looking up.
There it is. You’ve given yourself an escape route from something. You will be
able to drop down at the red charger. If you have yellow, you can do a lossy
backwards rocket jump into it. Do that!
Secret Ledge (from rocket jump at red Charger) ‑ Ammo cache and window. It does not connect to all those passages you see on the map. Very disappointing.
EW Window Hall ‑ Windows look out at white‑sided structures, very large and very tall. You see you are very high up. It exits to:
West ‑ N Intersection Room
East ‑ Sniper Room
Sniper Room
W ‑ EW Window Hall
N ‑ Window - The window is empty. Shots can go through. Many enemies are visible below, in Open N Area, Hunters, Enforcers, Purples. As you run back and forth, stirring them up, they gather at a corner, so you can use rockets or grenades, or try to preserve the Enforcer guns by using pistols. Shoot the switch through the window to open the E door.
E ‑ locked door (opened by shooting switch through N window) ‑ Blue T Hall
S ‑ locked door (opened by lower switch in Open N Area) ‑ you must jump down twice, moving S, to No Retreat Room
Blue T Hall
W ‑ Sniper Room
S ‑ Blocked Hall
N ‑ Rocky alcove ‑ Secret door Opens N‑ward to overlook the 3d section from left of Open N Area. Pointless.
E ‑ Downward stairs to Open N Area
Open N Area ‑ 3 NS walls divide it into sections, leaving open a corridor EW at N end. Use these walls for cover as you advance to Enforcer.
SE facing S ‑ stairs to Blue T Hall
SE facing E ‑ Terminal ‑ Alien threatens you again. His monitor screens remind you there are Enforcers ahead.
SE facing W ‑ Switch ‑ It stays
on, at least for minutes. What does it do?
NW ‑ Surviving Enforcers
NW & Up ‑ Switch you shot to open E door in Sniper Room
SE corner of W‑most section ‑ Switch & Ammo cache ‑ Watch out, an Enforcer beams in behind you. The switch goes on and off quickly then is inoperative. It opened the S door of the Sniper Room. Lots of drones will be released, likely encountered in Blue T Hall now so have your fusion pistol up. Be sure to get those behind the barricade in the Blocked Hall. They can barely even shoot back.
No Retreat Room
W ‑ window and annoying obstacles
S ‑ Terminal ‑ Pirate admits that, in retrospect, some decisions may have been unwise. The majority of his people are dead and he fears annihilation. A Human warship is arriving, but he’s still going to kill you at least.
N ‑Where you jumped down. Tactically, at least there is a small alcove.
E ‑ you see a Yellow Charger down the stairs. I smell an ambush.
Yellow Charger Room ‑ Yup, it’s an ambush. The S wall opens to reveal many troopers and some come from the N. I used two rockets then they fought among themselves and I needed to use one grenade to clean up.
S ‑ false wall that opens to reveal small alcove filled with Troopers
W ‑ stairs to No Retreat Room
E ‑ Yellow Charger
N ‑ stairs to Annoying Blockages Room
Annoying Blockages Room ‑ I should have known. The annoying blockages were to impede retreat when a false wall opened up on my right, slightly behind me, to reveal many Troopers and Fighters. Even so, I survived the first try! I retreated back to the Yellow Charger Room and used grenades on the stairs as they tried to advance. At least there was an ammo cache in the alcove.
S ‑ stairs to Yellow Charger Room
E in middle ‑ false wall that opens to reveal Troopers and Fighters
NE ‑ blocked hall
NW ‑ Very Slow Downward Elevator
Very Slow Downward Elevator
The switch to operate it is on the wall within it.
I lost all traction as it descended.
Part way down, an alcove opened, revealing many Hunters and Troopers, which killed me. Therefore, I recommend 2 things:
a) Turn the switch on and get back off, letting the elevator descend without you; and
b) Retreating from the No Retreat Room. It will be expensive and a bit risky, but with 4 rockets you can climb back up by trying two Double Backwards Lossless Rocket Jumps. I succeeded on the first jump, but hurt myself on the second. On another attempt, I hurt myself on the first and succeeded on the 2d. So, it’s possible. It’s just at the edge of possible. Remember, the first shot pushes you backwards into the wall and up just enough that you can aim the 2d shot slightly more downwards for greater lift. Even though it is harder to aim at precisely the right spot, I had better luck running backwards while I was shooting. Save and Return. If you do get back up with yellow, try jumping up to that passage above the red charger!
You can start and stop the elevator by shooting the switch. I let the elevator go to the bottom, then I jumped into the alcove. From there, they were helpless as I grenaded them. Unfortunately, then I had to ride it so slowly all the way up and down again.
There is a second alcove, farther down.
At the bottom there are spiral stairs to a Long Bending Hall
Long Bending Hall ‑ It looks like it is going to lead to the escape route, but doesn’t. Instead, it goes past some windows, and a view at some machinery, to a dead end with a window. The window didn’t hold my attention quite long enough for the ambush. The wall had opened up shortly past the machinery, unleashing Troopers, Hunters, and Tanks. The Tanks seemed to stay in that room, guarding the Exit Terminal there. I was able to get them to hit the corner with their own grenades, which hurt them and would get them fighting. But Tank in‑fighting seems pointless, because they use the flames, and the flames don’t seem to hurt them much, if at all. And occasionally, they would miss the corner. I didn’t have a good retreat, so then I would get hurt. I decided on a more direct attack, exposing one of them, then emptying my AR, retreating and repeating.
Exit Terminal ‑ You’re promoted to Seargeant and you get 48 hours leave. Yay? What do you have to do to make Lieutenant? Teleports you to a little hallway. Hit the switch. A window is opened to a room with flashing lights, which eventually coalesce into “MMMG”. That stands for Marathon Map Makers Guild, which made this scenario. A Terminal is lowered, which thanks you for playing Devil In A Blue Dress 2.0. Then you teleport to “HackoRama”
22. Hackorama
Just a blank screen, then the game is over.